 Sims 2 – Beginner’s Meshing Tutorial – Simple Candlestick (Views:
87,125
)
Intro and extracting the mesh
What you will need:
SimPE
Wings 3D
UV Mapper
Gimp
CEP
Legacy Nvidia DDS Utilities – Download and install them, just like any Windows program, then start SimPE, select the menu ‘Extra’, ‘Preferences’ and fill in the field ‘Nvidia DDS Tools’ with the exact installation path (you can use the “Browse” button to find the folder where the DDS Utilities are installed).
Managed Direct X – Required for working with Sims 2 meshes within SimPE
**************************************************
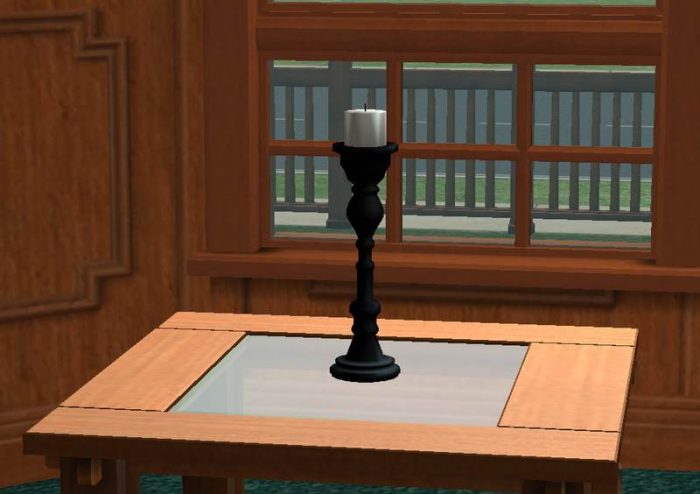
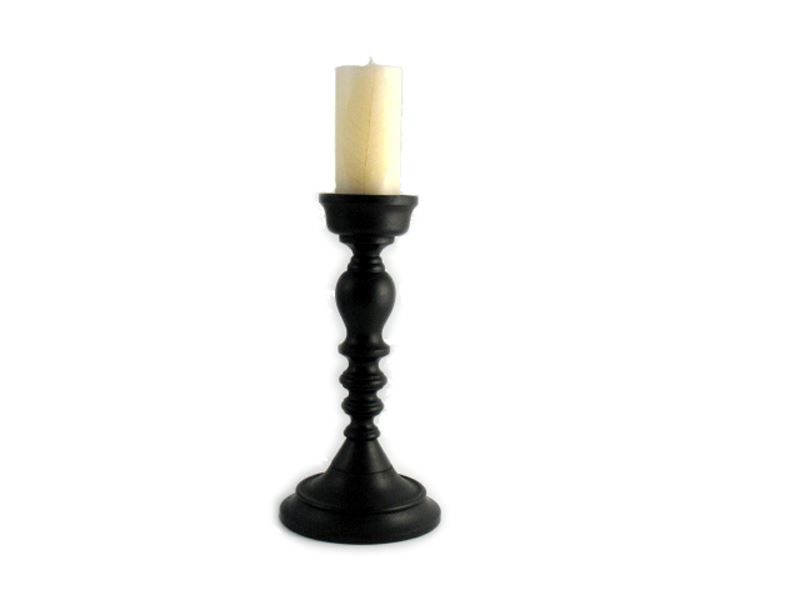
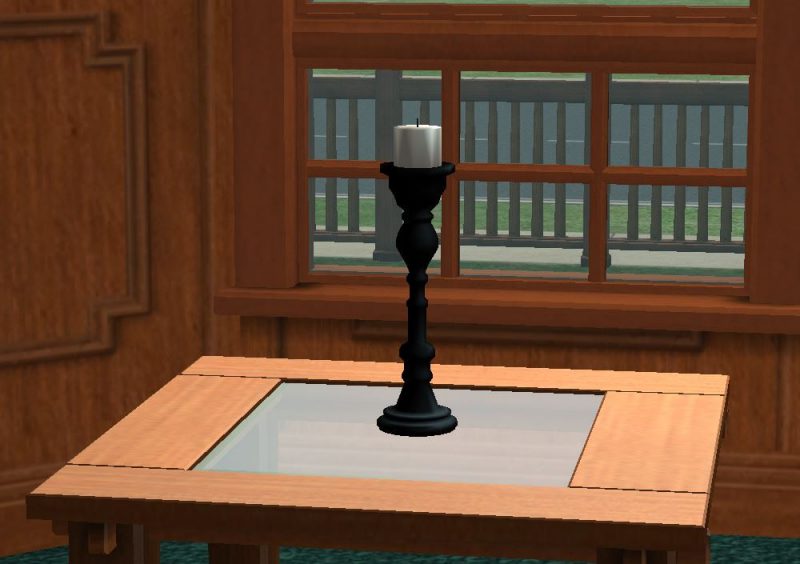
First of all you need to know that I’m an absolute beginner at meshing, so this tutorial will be very basic. However, I think it’s important to have an easy-to-follow tutorial with plenty of pictures, because meshing is not easy! I’ve split the tutorial over several pages to hopefully make things less cluttered. We are going to make a simple candlestick for this tutorial:
Mine won’t be exactly the same as I’ll rush through it for the purpose of this tutorial. For an in-depth tutorial on creating a table, click here.
Here are the steps involved:
Clone an object using SimPE – Use a base game object if possible, so more people will be able to use it in their game
Extract the mesh (3D file) from that object
Import the mesh into Wings 3D
Create your own mesh
Map the mesh
Texture the map
Import into SimPE
Create the finished object in SimPE
Testing the new object
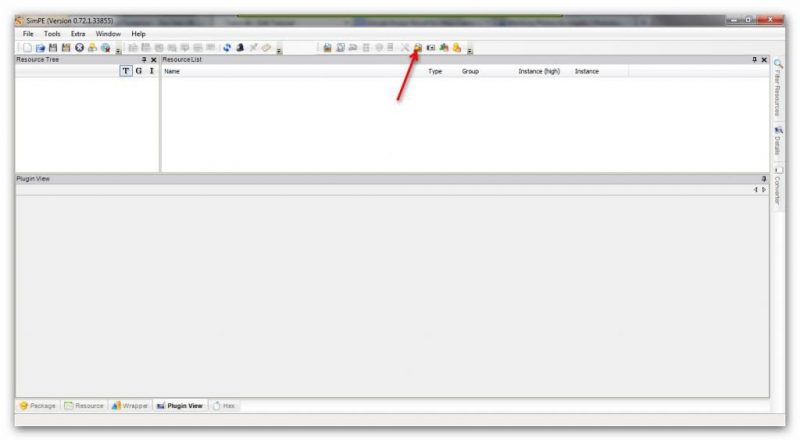
Okay, first we need to clone the object using SimPE, so go ahead and open it up. We need to access the ‘Object Workshop’:
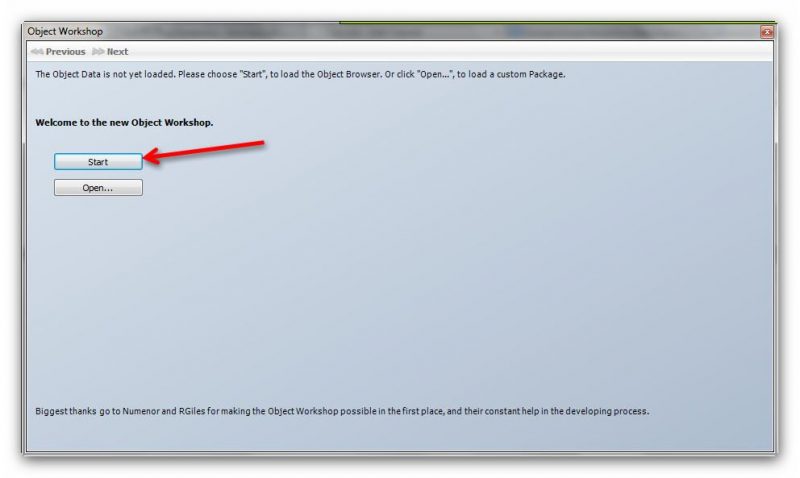
You can also find the ‘Object Workshop’ under the ‘Window’ menu at the top. Once it’s open, click ‘Start’:
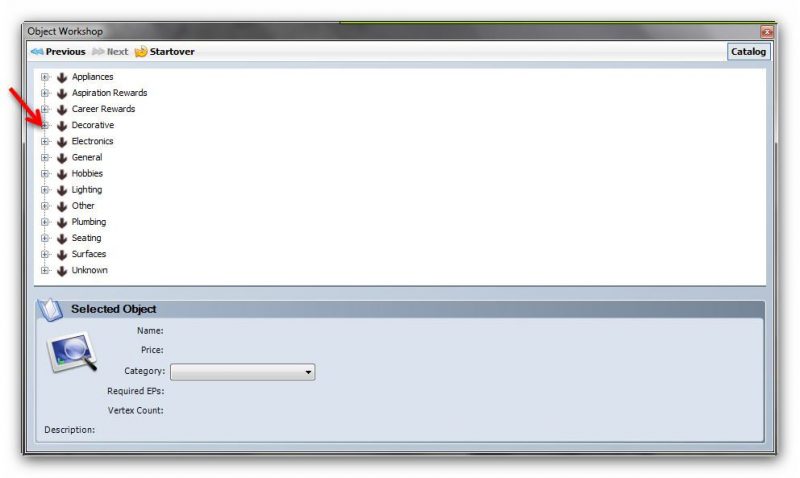
It takes a while to load the objects, but when the list appears, click the cross next to ‘Decorative’ to show the items in that list:
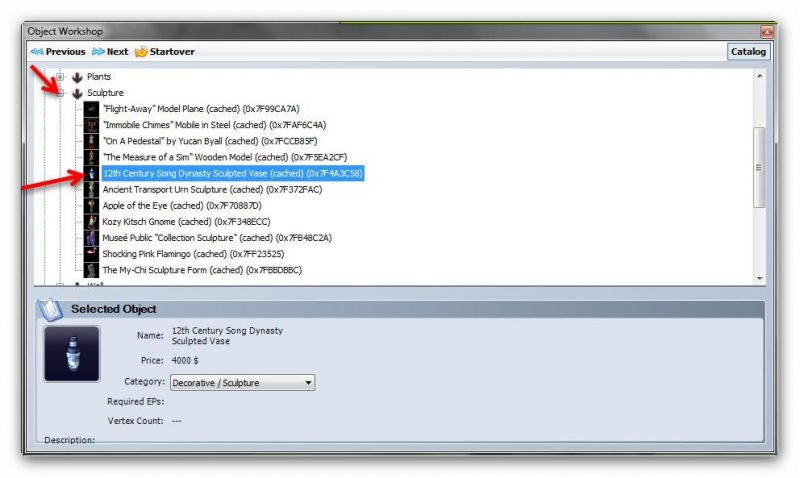
Select ‘Sculpture’ and the dynasty vase – this is nice and easy to clone and has no pesky shadows etc:
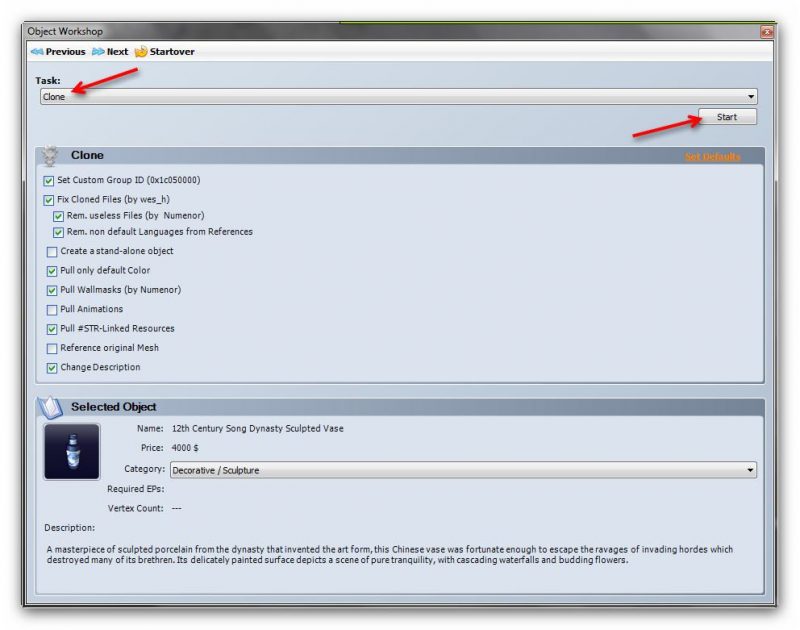
Click ‘Next’ at the top, then ‘Clone’ and ‘Start’:
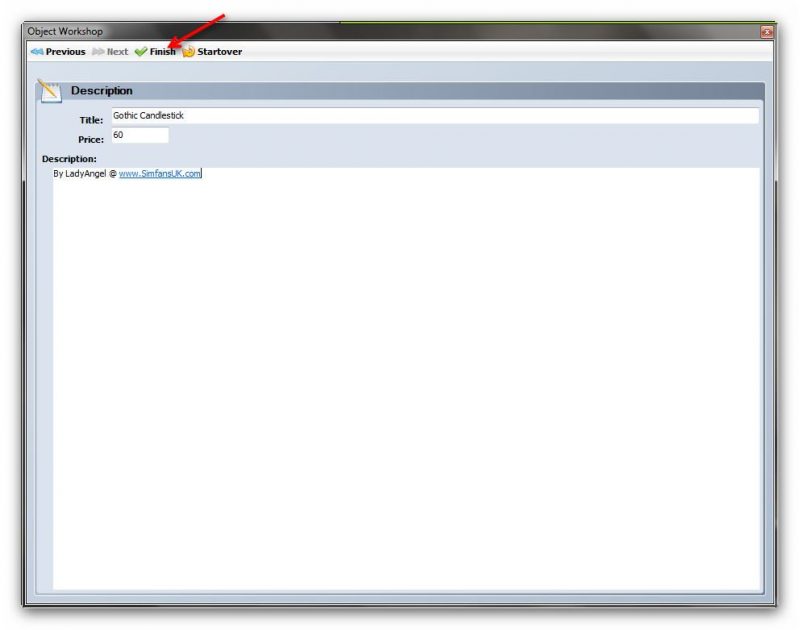
Enter the details of the item you are creating then click ‘Finish’:
Rename just the first part of the model name, update and click ‘OK’:
I have a folder on my desktop called ‘Candlestick’ so I can easily find it there. Save your cloned object, giving it a name with which you can identify it:
You can close down the Object Workshop window, and SimPE will now look like this, showing your cloned object files:
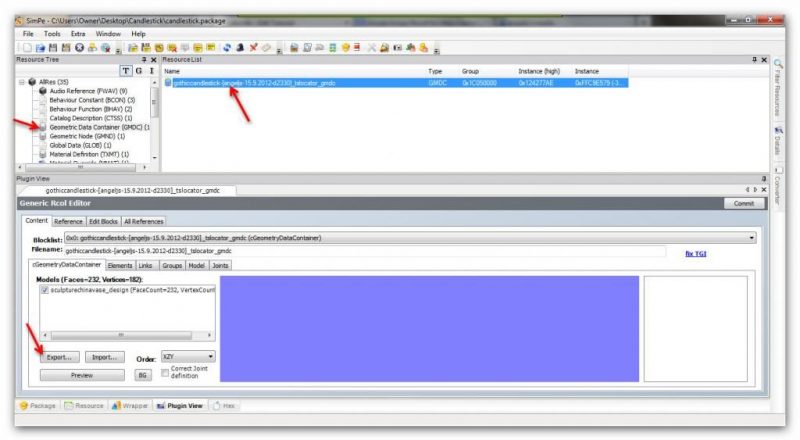
Now we need to extract the mesh that we are going to use. To do this, on the left menu click ‘Geometric Data Container (GMDC)’ and select the GMDC file in the ‘Resource List’. In this instance there is only one file, so it’s easy to find. Once you’ve done that, click ‘Export’ at the bottom-left of the window:
Save the mesh to the same folder as the cloned file and close down SimPE for now:
Creating your own mesh
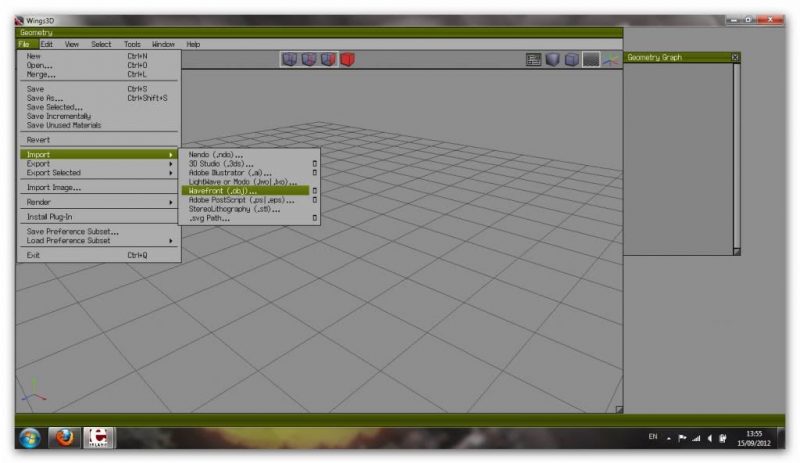
Now to import and edit the file. Open up Wings 3D and import the extracted mesh. Go to ‘File’, ‘Import’ and ‘Wavefront (.obj)’:
Browse to the folder you created earlier and open the mesh file:
Now, this important, we need to create a bounding box around the object. This is because we need to keep our object the same dimensions as the one we’ve imported. It’s not so important for decorative objects, but if we were creating a chair, table, bed etc., then the bounding box would ensure that the object we create can be used correctly in-game. For instance, if we created one of the above items but didn’t have the correct dimensions, our Sims would probably float above them or sink into them while using them!
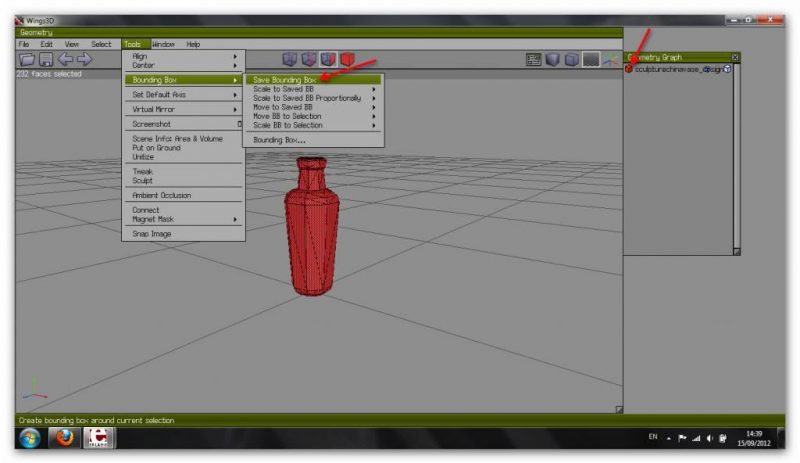
Here’s how to do it – In the ‘Geometry Graph’ window to the right, select the entire item by clicking the little cube to the left of the name. Then from the top menu, click ‘Tools’, ‘Bounding Box’, ‘Save Bounding Box’:
Do you see the green box that now surrounds the object? As long as we stay within these dimensions, we’ll by ok. Like I said, with this being a decorative object, it’s not so important, but I still use bounding boxes on ornaments etc. as it helps a lot to see your boundaries.
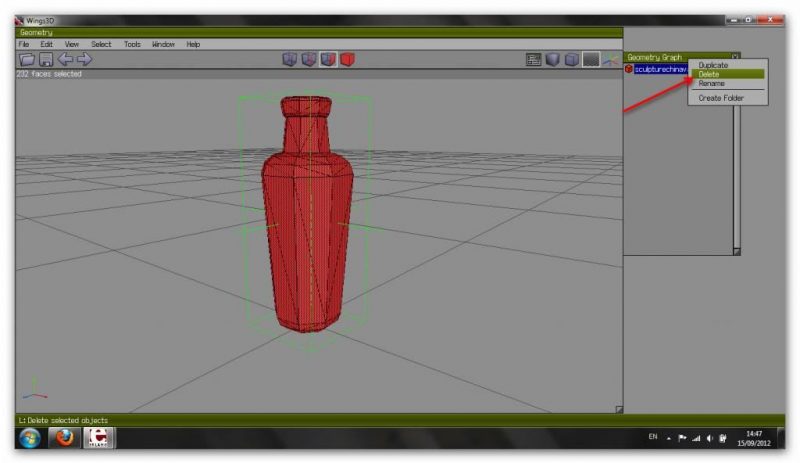
Now you can right-click on the object name to delete it:
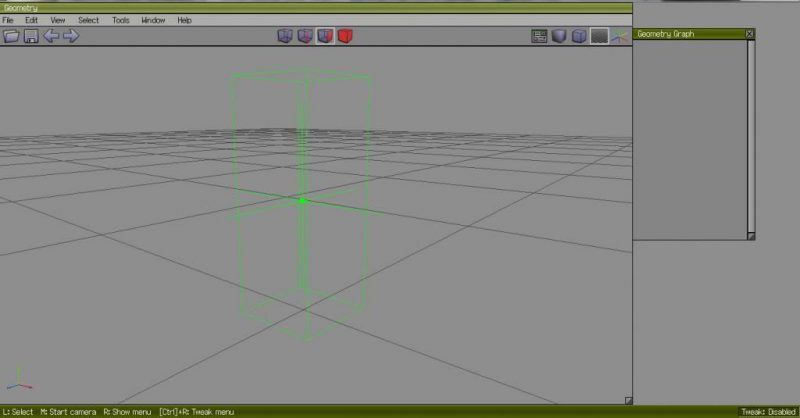
Now we’re just left with the bounding box:
The bounding box also serves another good purpose. We can add shapes and constrain them to the box dimensions. So that’s what we’ll do. We are going to add a cylinder, but first of all, a quick word about the little cubes at the top:
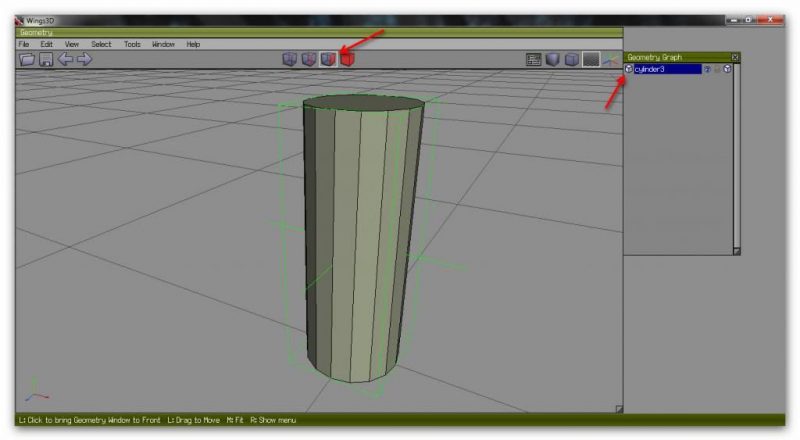
I’m going to call these cube 1, cube 2, cube 3 and cube 4. Cube 1 will show you the vertices, or connecting points, on the object. Cube 2 shows you the lines, cube 3 lets you select single faces, and cube 4 selects all of the object. That’s a need to know, but not so much for this tutorial.
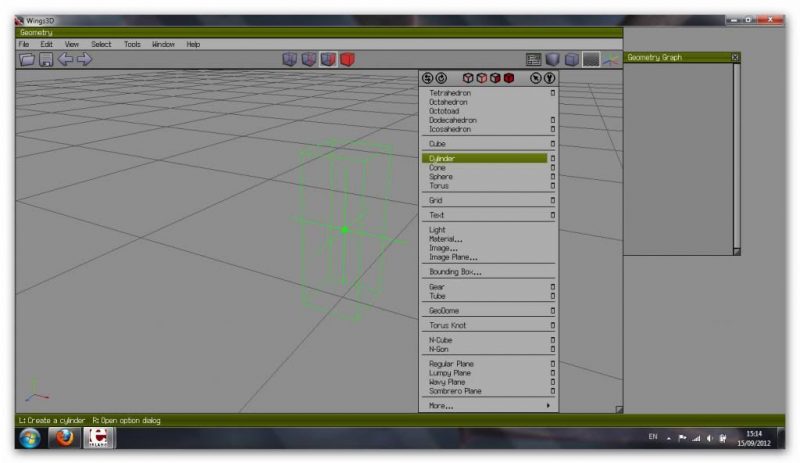
Okay, to create a cylinder, right-click in the main window and select ‘Cylinder’ (I mistakenly created a cube, but the process is the same, so just ignore that! ‘:
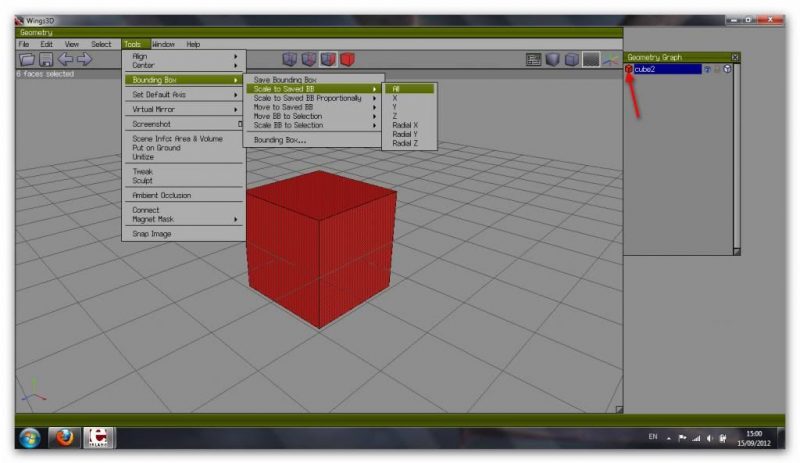
Use your mouse scroller (if you have one) to scroll out, or click ‘R’ on your keyboard to get to full view. Now you see the cylinder is enormous, far too big for our purposes. This is where the bounding box comes in. Select your cylinder, and then ‘Tools’, ‘Bounding Box’, ‘Scale to Saved BB’, ‘All’:
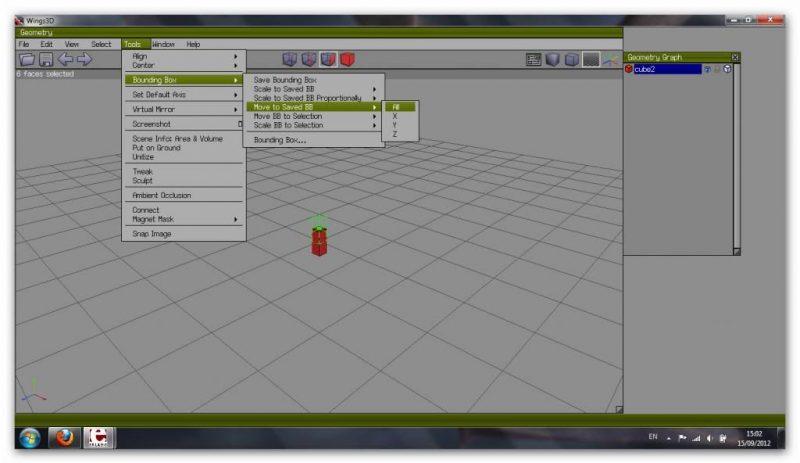
Then ‘Tools’, ‘Bounding Box’, ‘Moved to Saved BB’, ‘All’:
Now see? We have a cylinder the exact size of the ornament we cloned. You can scroll in to see it properly.
Note: If you do no have a scroller on your mouse, you are going to have to use the hotkeys. You can find these in the ‘Help’ menu at the top.
If you click the scroller, you can move around the object quite freely. Just click the left button to get back to normal. If you keep the scroller pressed, you can move the view from side to side. It’s up to you to get used to using the mouse and/or keys with the software, but there are tutorials around to help:
https://www.wings3d.com/paulthepuzzles/aardvarks.html
https://www.wings3d.com/wiki.php?title=Community
Now, deselect the cylinder and click on cube 3 at the top:
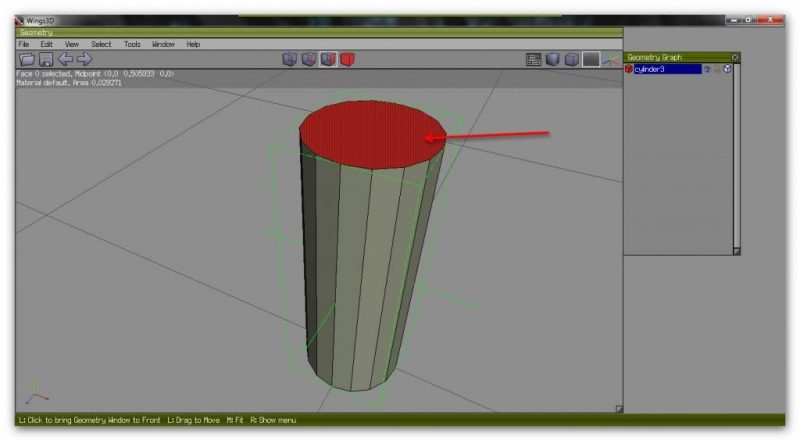
This is so we can select just one part, so click on the very top face:
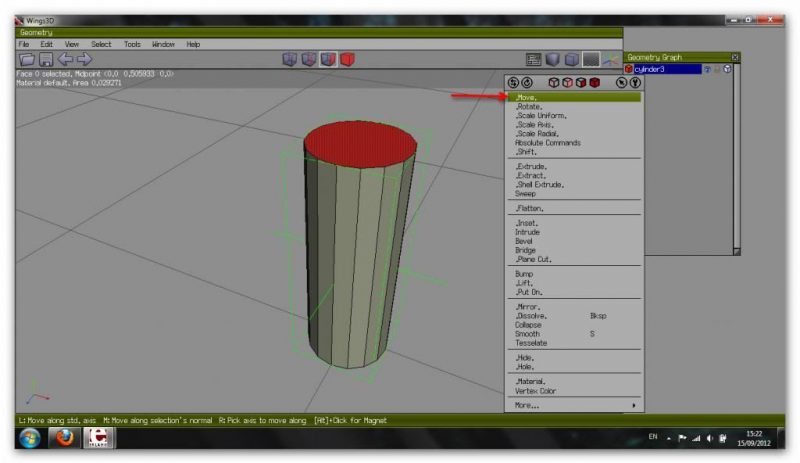
Now right-click and select ‘Move’:
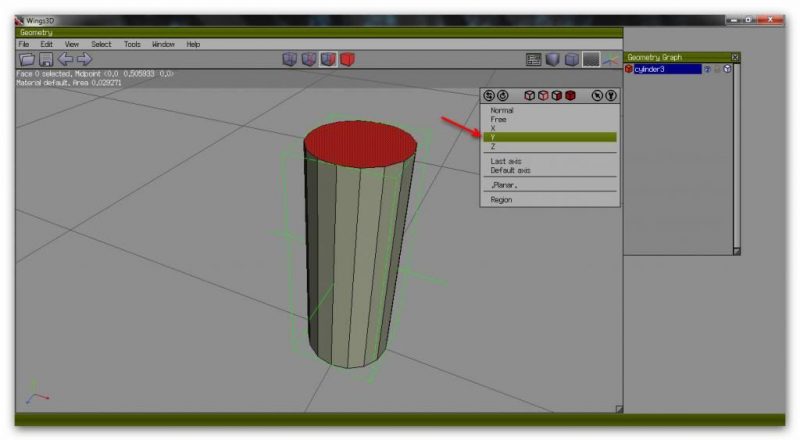
To move things straight up and down we need to select ‘Y’:
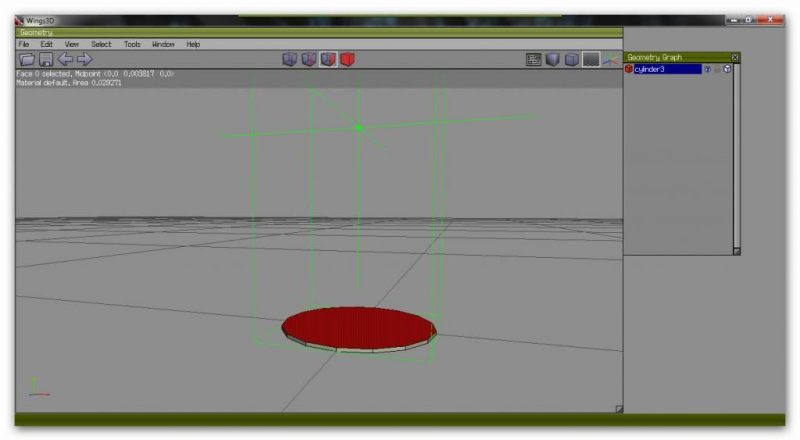
Move your mouse to the left or right to move the edge down until it’s quite flat:
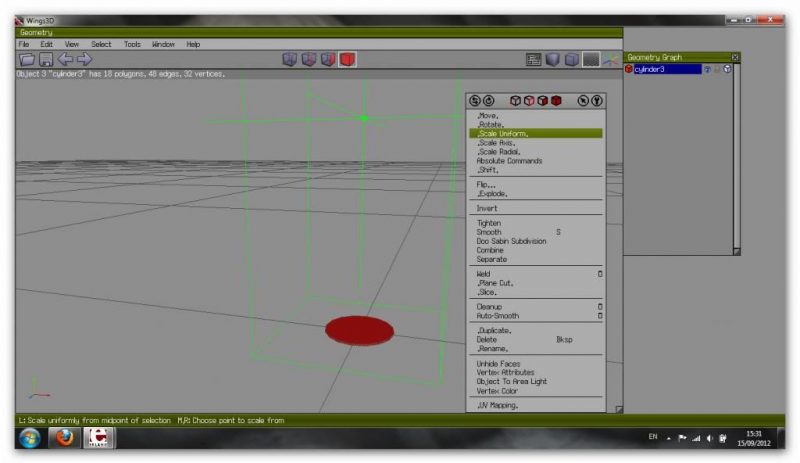
Now, I personally think this is too big for a candlestick so I’m going to resize it. You don’t have to, it’s up to you. If you want to, just click cube 4 to select the whole item, right-click and ‘Scale Uniform’. Then move your mouse left or right until you have it the width you want it:
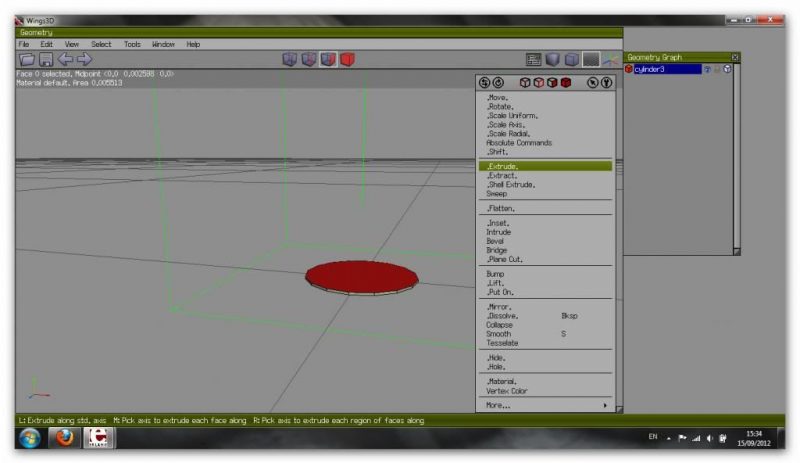
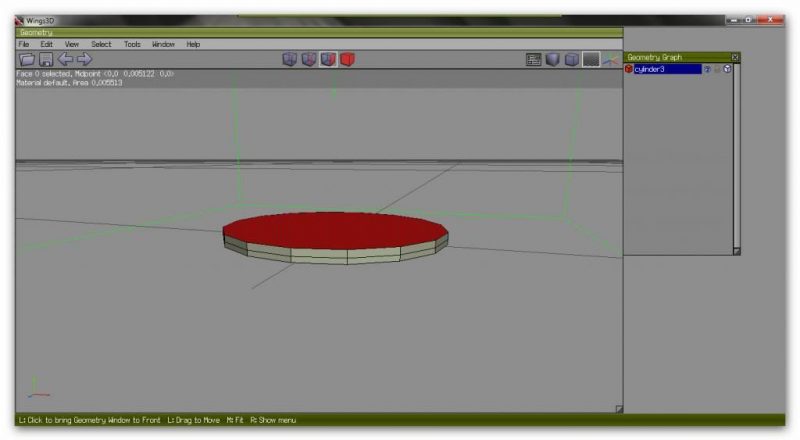
Now for the fun part…shaping your model. To create a curve, we need to add, or extrude, a piece from the top of the model. Deselect the model, click cube 3 and select the top face again. Right-click and select ‘Extrude’:
Select ‘Y’ again and use your mouse, moving it left or right again, to raise a small section from the top:
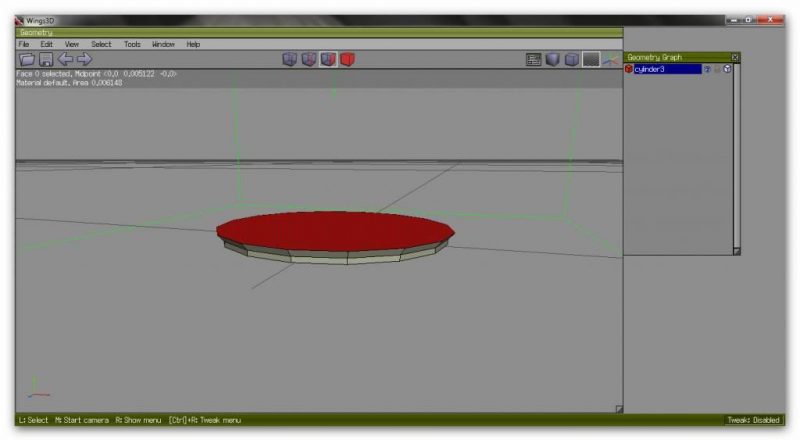
By right-clicking and selecting ‘Scale Uniform’ again, we can bring that section out a little:
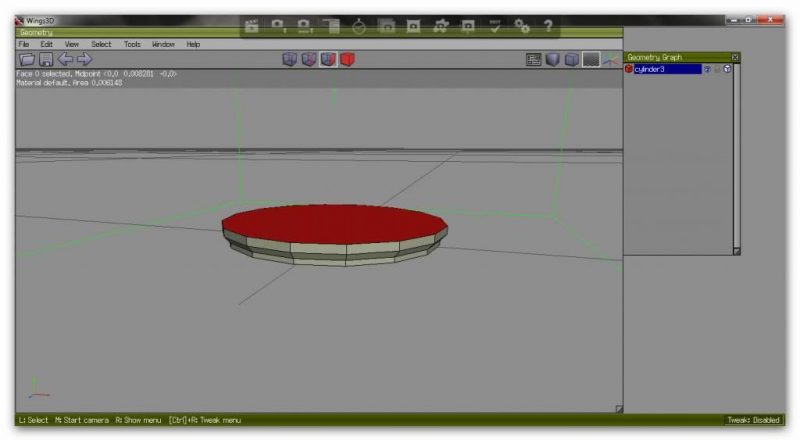
Extrude ‘Y’ again to raise a bit more:
And again, but scale uniform again to bring it in a bit:
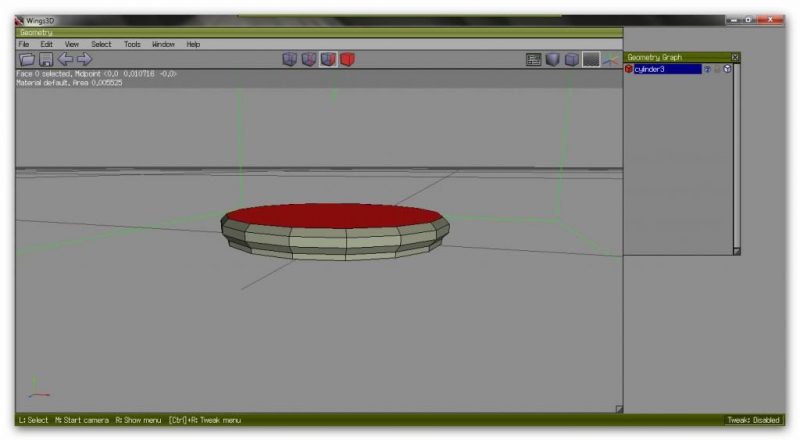
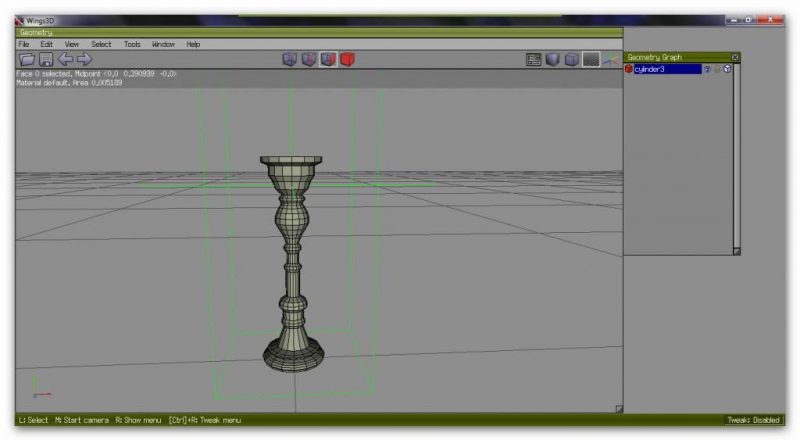
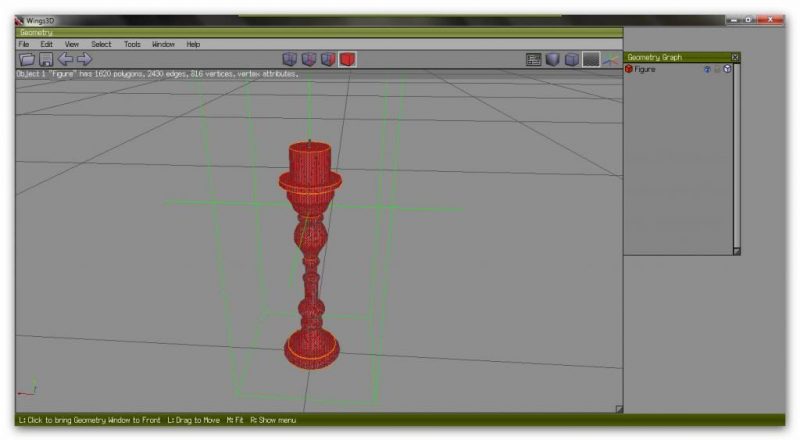
Do you see the curve being created now? Basically, it’s just a matter of using ‘Extrude’, ‘Y’ and ‘Scale Uniform’ to create the entire shape of the candlestick. It doesn’t have to be perfect, or even as detailed as the one in the picture, but you get the general idea. You can see the one I created below – It’s not perfect or brilliant, and you will probably have something better, but for the purpose of this tutorial, it will do:
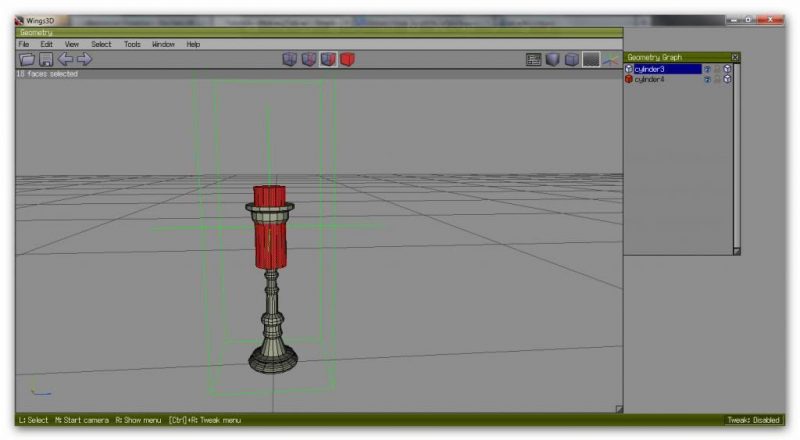
Now to create the candle. Just create another cylinder, then scale and save it to the bounding box. Scale uniform until it’s the width you want:
Right-click, ‘Move’, ‘Y’ and move it up:
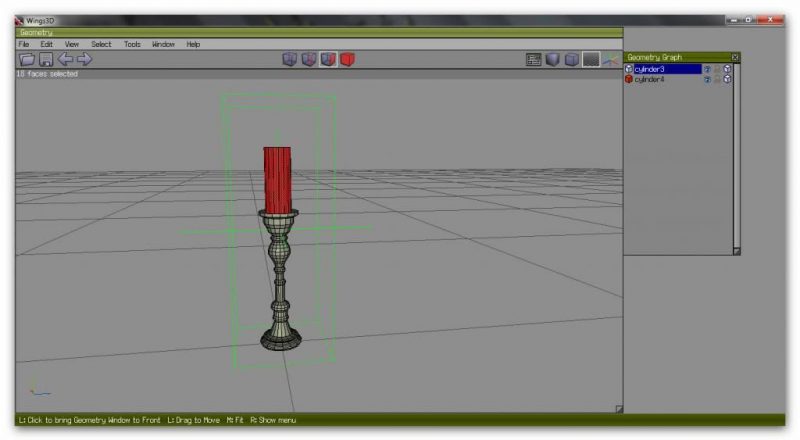
That’s too tall for my liking, so I just selected the top face, right-click, ‘Move’, ‘Y’ to lower it:
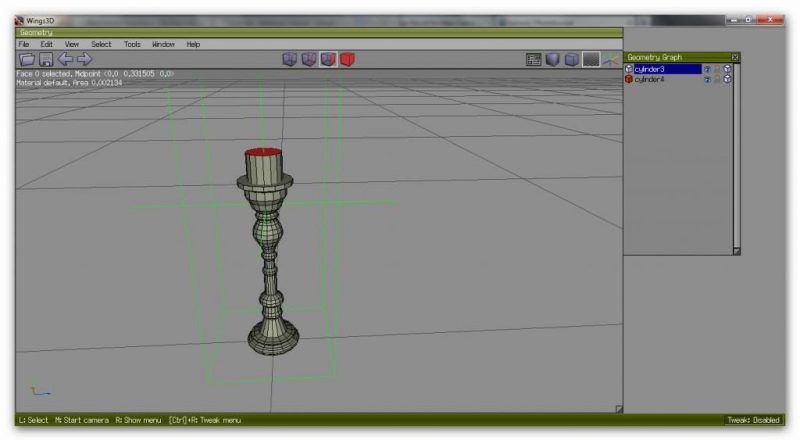
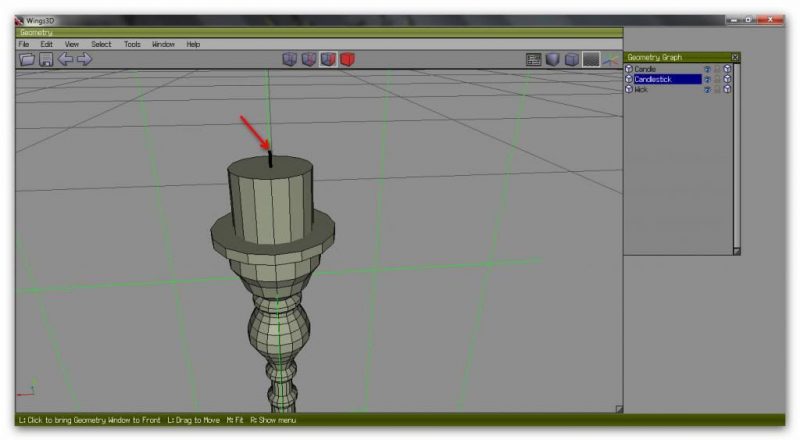
Now I wanted a little wick on the top, so I created another cylinder, resized it and moved it to the top, but you don’t need to do that, I was just trying to be clever!:
As a note, in the Geometry Graph window, you can right-click on each cylinder to rename them. I’ve done so as it helps when mapping to know what each part is.
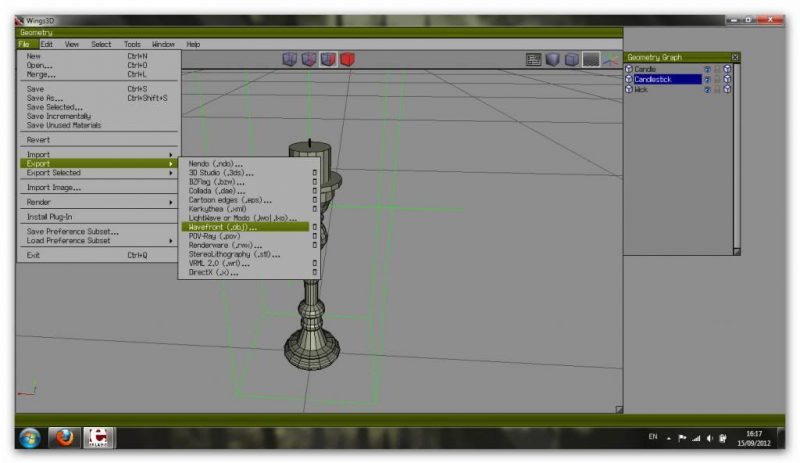
You can save your mesh at any time by exporting it as an object file:
I would save this as something different, just in case I needed the original bounding box again, as the BB doesn’t save with your mesh:
(Note: I’ve since learned that it’s better to triangulate after you have mapped and saved your mesh image, so you can follow the below steps then!)
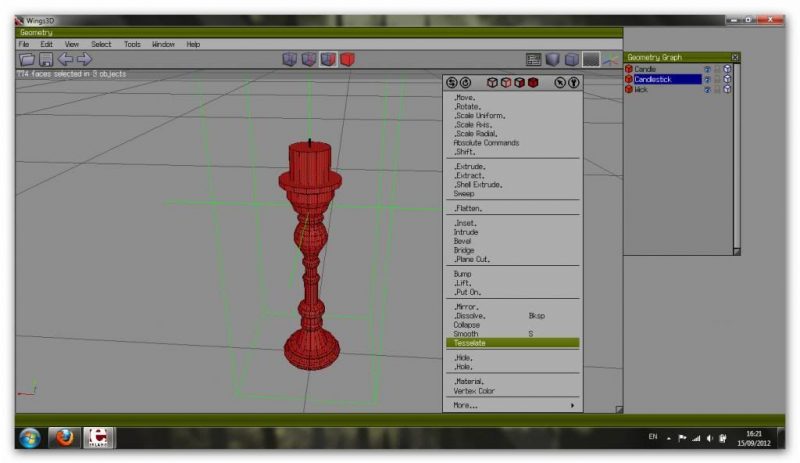
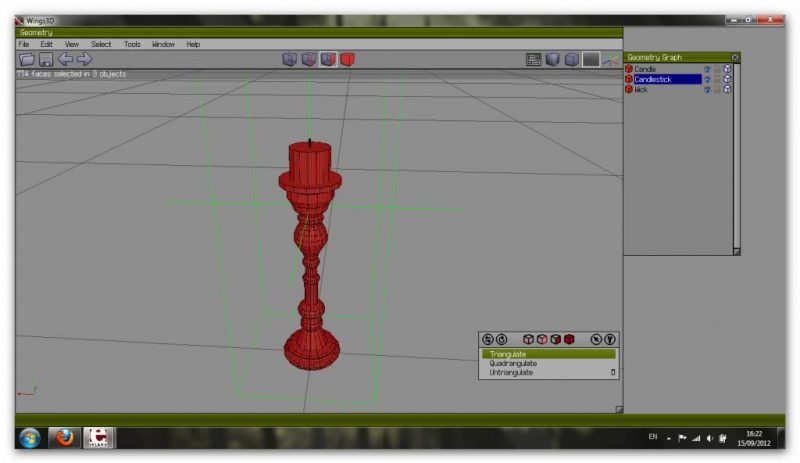
To get it ready for mapping, select all parts, right click, then select ‘Tesselate’, ‘Triangulate’. I don’t know why, but apparently this is essential for your mesh to show up properly in-game:
Export again, but this time call it something ‘map’. This means we don’t write over the mesh we’ve just created, then if something goes wrong with the mapping, we can just re-import the un-triangulated one:
Now to map your mesh!
Mapping the mesh
Now you deserve a cuppa! You may want to take a break now, or carry on, but if you find yourself getting flustered or irritated, please stop and come back to it later.
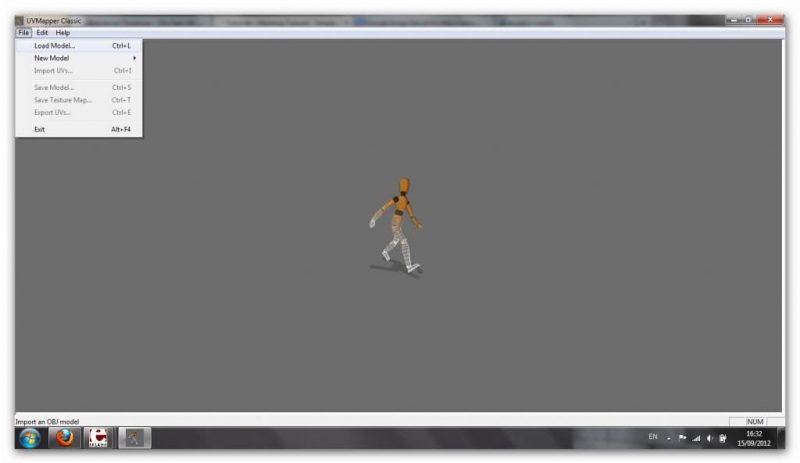
Although I will be using UV Mapper Classic for this, if you are serious about meshing I would recommend you purchase the pro version, but it’s not cheap! However, for now, double-click on the UVMapper icon to open it. Take no notice of the cute, little man (it’s not often I say that!). Click ‘File’, ‘Load Model’:
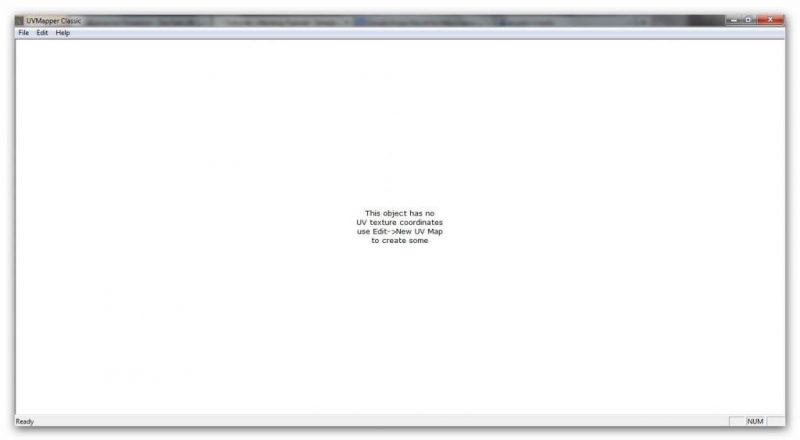
Surf to the map file you just exported from Wings 3D and open it. Click ‘OK’ on the statistics box and then you will see the following window:
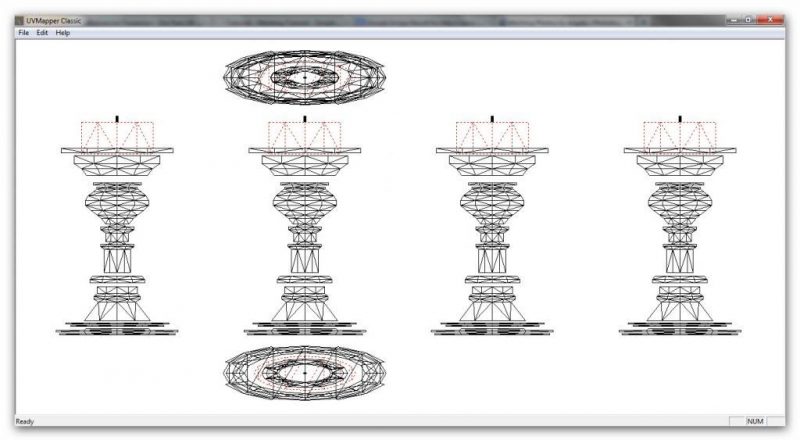
We are going to need to map each item we just created. In my case it was 3, but it depends on whether or not you created the candle and wick. I’ll assume you did for the purpose of this tutorial.
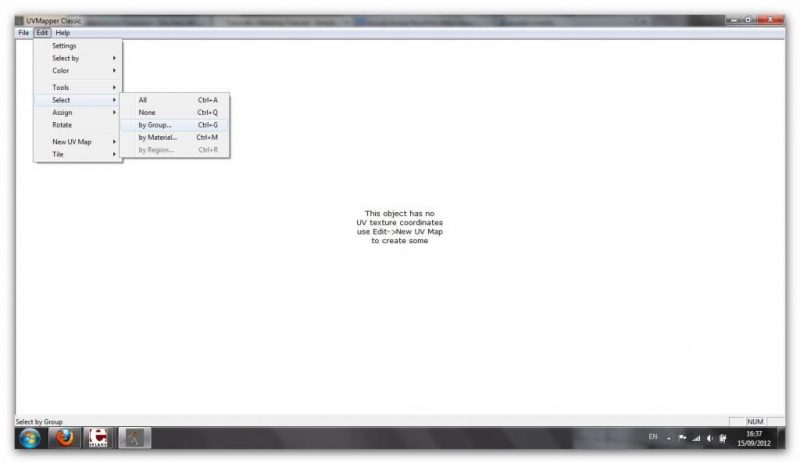
Click ‘Edit’, ‘Select’, ‘by Group’:
Click whatever comes up at the top of the list and click ‘OK’:
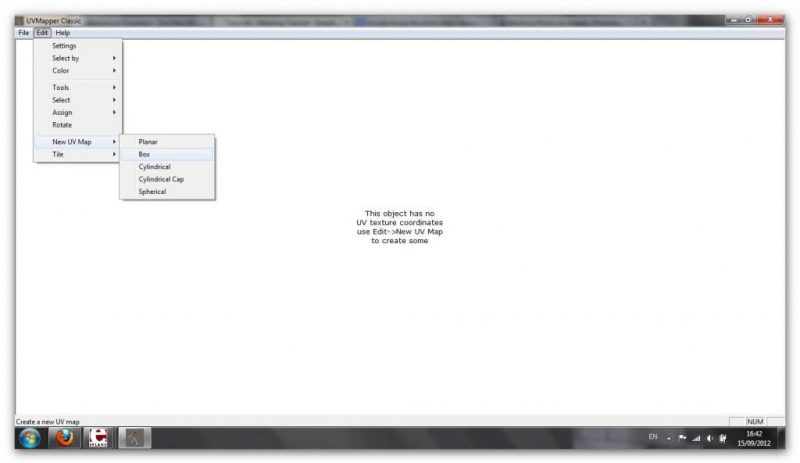
Now ‘Edit’, ‘New UV Map’ and ‘Box’. Leave the options as they are click ‘OK’:
Now you’ll see the whole thing, but don’t worry, we’re going to fix that:
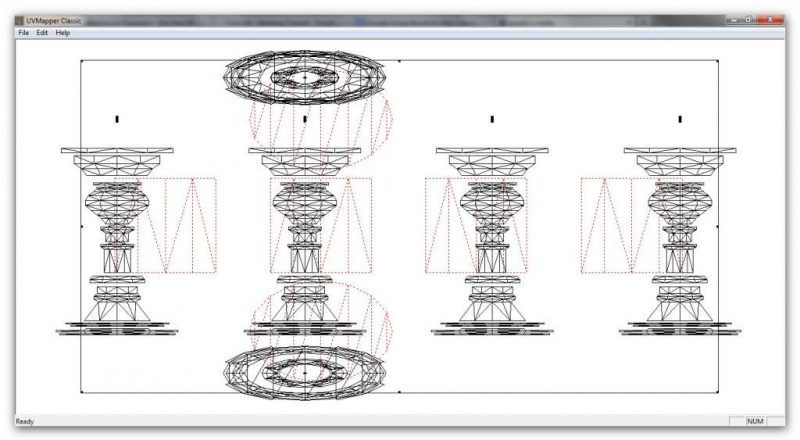
Now, go through the last 2 steps again – ‘File’, ‘Select’, ‘by Group’, then select the candle, then ‘File’, ‘New UV Map’ and ‘Box’. Now you’ll see the candle mapped and highlighted in red:
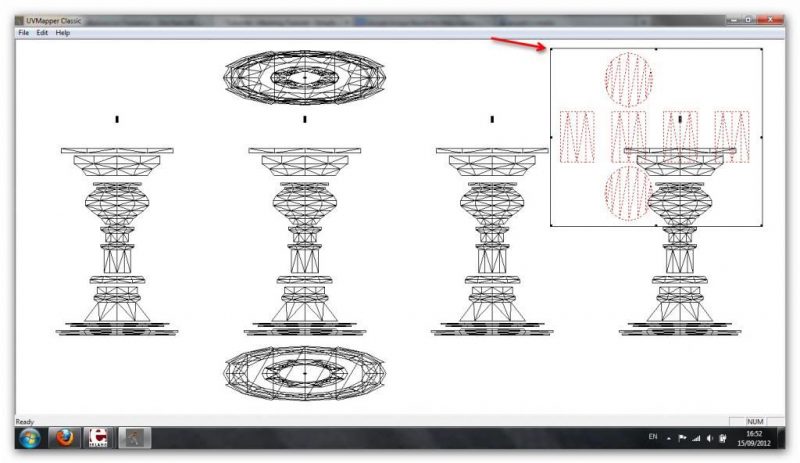
You can resize this section and move it into the corner somewhere:
Don’t make it too thin or wide as this will mess up the texture, which is the thing I have the most problem with when using UV Mapper Classic.
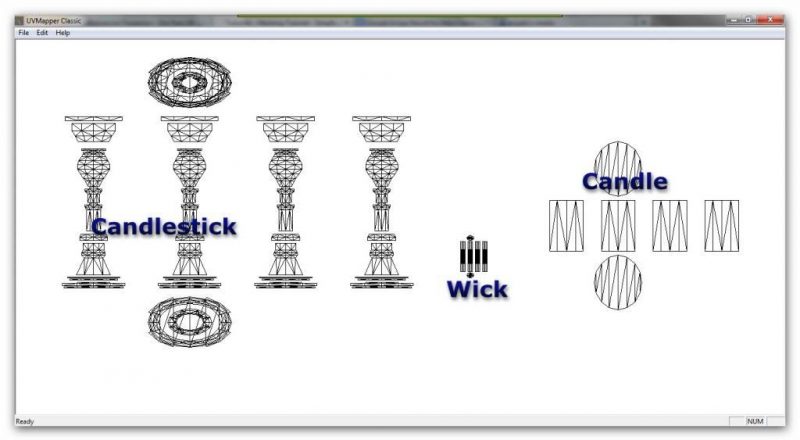
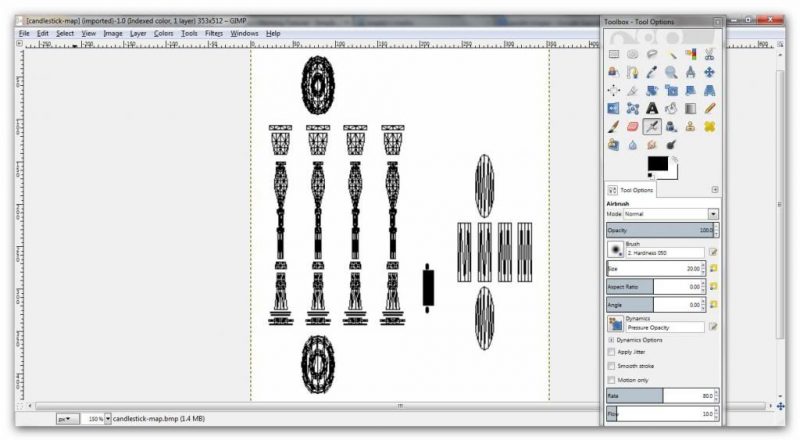
Now do the same for the candlestick and the wick, selecting them by group, then creating a new, box UV map, and resizing and moving them neatly until your page looks like this:
Because your wick and the candle will only have one texture applied, you can map it them as a cylinder rather than a box, but mapping as a box gives you more detail, so if you wanted to add shading when adding your texture it’s easier to see etc.
Now go to ‘File’, ‘Save Model’ and leave all the settings as they are:
Overwrite your map file and click ‘Save’:
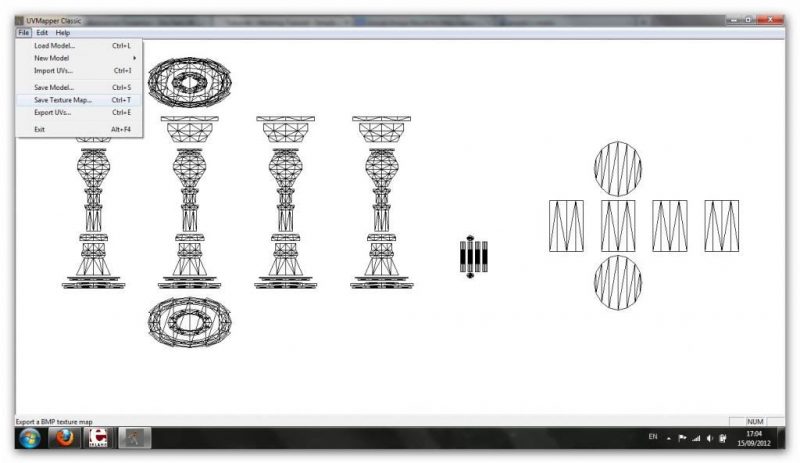
Now ‘File’ and ‘Save Texture Map’:
Change the image size to 512×512 and save the image to the same folder as everything else:
This is when you would go back to Wings 3D, close down the file without saving it, re-import it, triangulate, export, then follow the below steps in UVMapper.
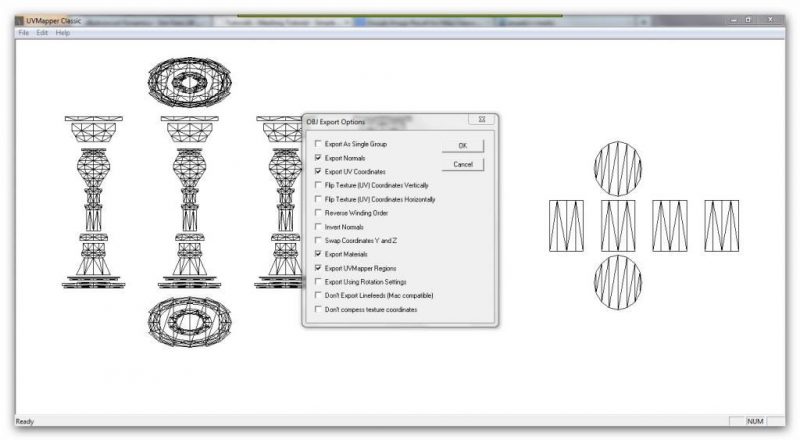
Now re-load the map (‘File’, ‘Load Model’), then click ‘Edit’, ‘Tools’, ‘Weld Vertices’. Save the model again, this time make sure ‘Export as single group’ is selected:
Now leave the program open and go back into Wings 3D. If you still have your object there, go to ‘File’, ‘New’ and don’t save it.
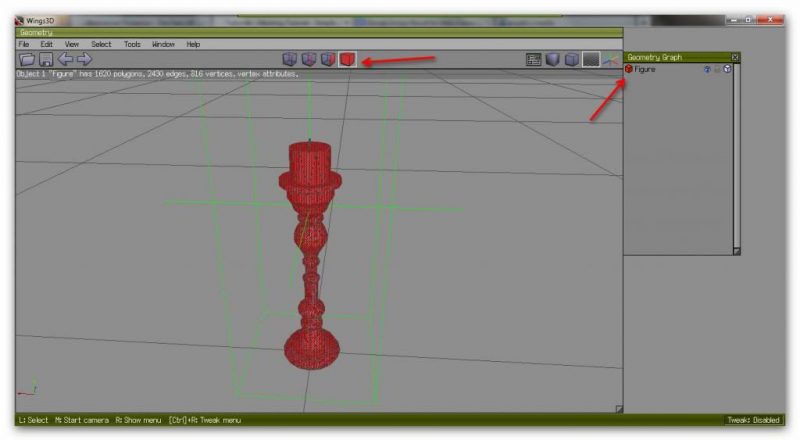
Import your map and notice how there is just one part now, select it and make sure cube 4 is selected at the top:
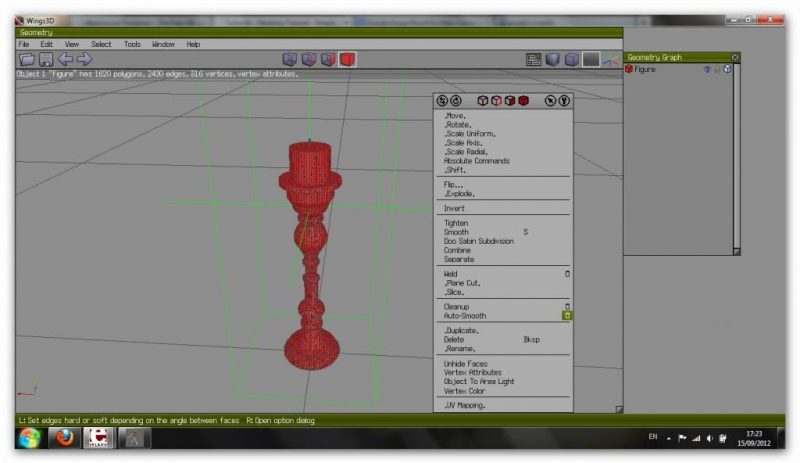
Right-click and click the little button next to ‘Auto Smooth’:
Click ‘OK’ and notice how immediately the edges of your model are much more defined:
Export the file again. You can now close Wings 3D as we are finished with it. In UV Mapper, load the model again, then save it, overwriting the file, then close it down.
Well done! If you have managed to get this far without giving up you deserve a medal! lol. Now for the texturing…
Adding the texture
If you have got as far as meshing, you will probably already have re-coloured Sims items, but this can be a little refresher.
Texture can be used to add as much detail as you want to your creations. You can search the net for seamless images which will be your best bet for re-colouring anything. You can mess around with shading and all kinds of other clever stuff for a really stunning object, but for this tutorial we’re going to do a basic texture only.
Start Gimp and open the texture file you saved with UV Mapper:
I’m not going to go into the ins and outs of layering etc., but do get to know Gimp if you don’t already, and do experiment with different textures etc. for each item you create.
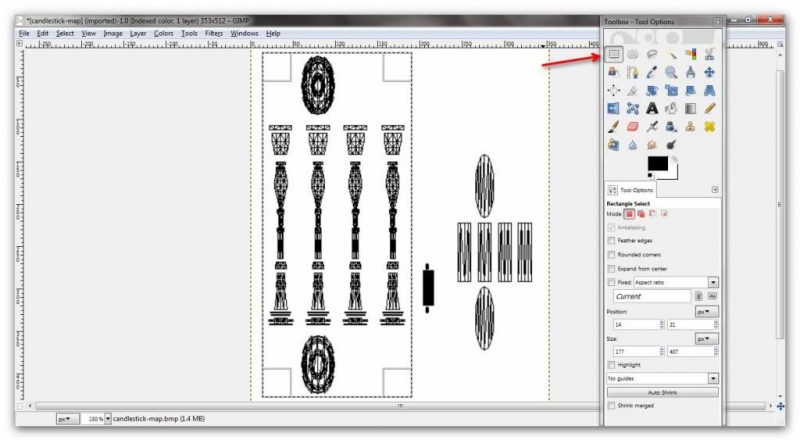
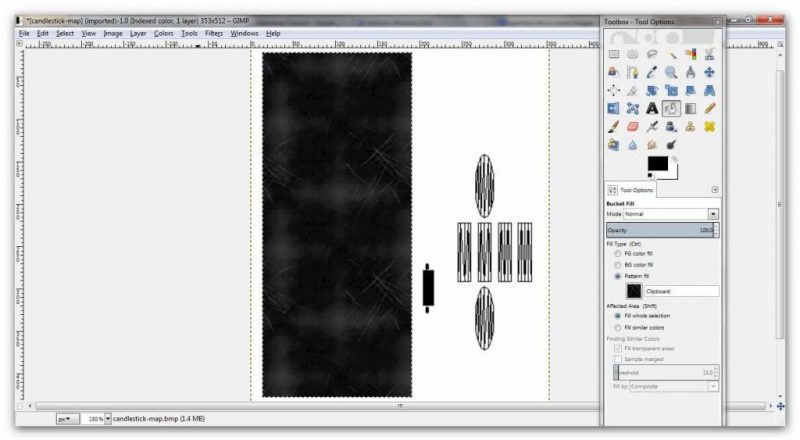
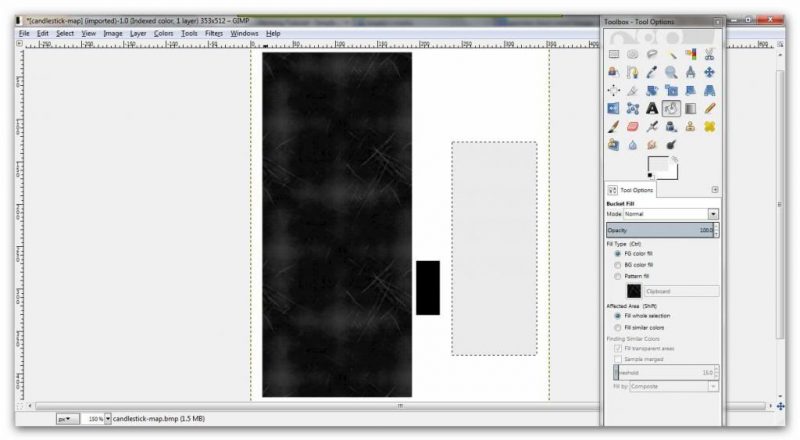
For the sake of quickness you can select the candlestick and either fill it with a solid colour (not recommended), an image you have saved, or a pattern:
Do the same with the wick and the candle:
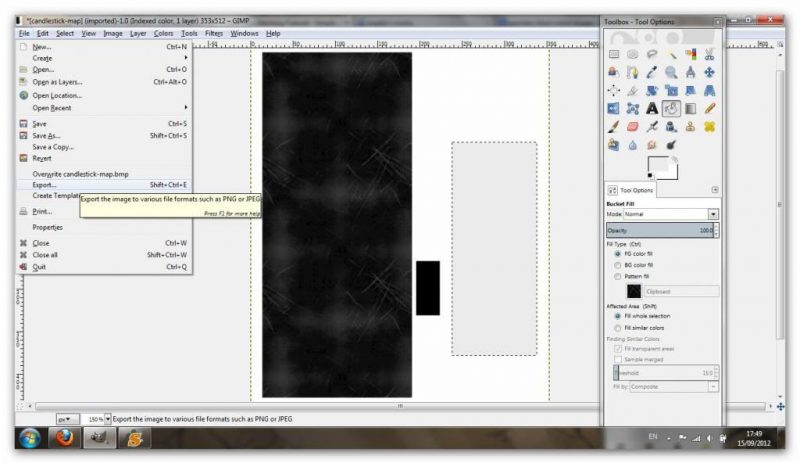
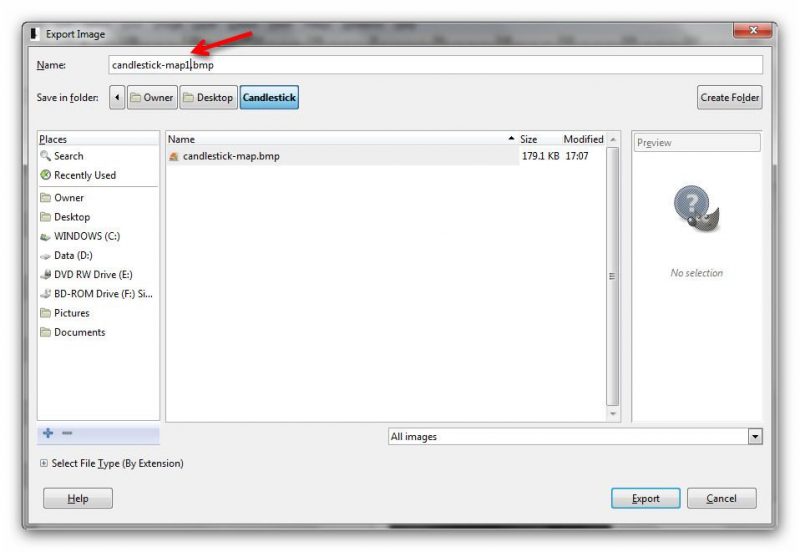
Then export the image as a .bmp file, but don’t overwrite your map as you may need it for easy re-colouring later:
There is far more you can do with texturing your objects than this, but that’s all I’m going to do with this. You need to practice re-colouring all kinds of items to be really good at it.
Now back to SimPE…
Import and create
Start SimPE and open the file you cloned earlier (‘File’, Open’…)
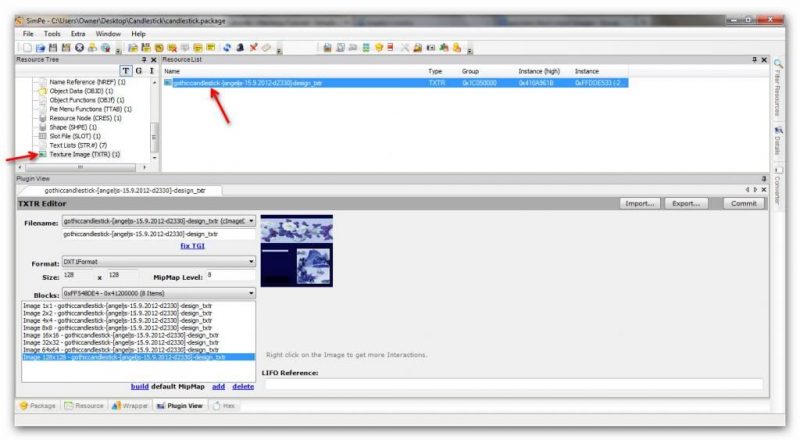
Select the texture image from the left menu, then click on the texture file in the Resource List:
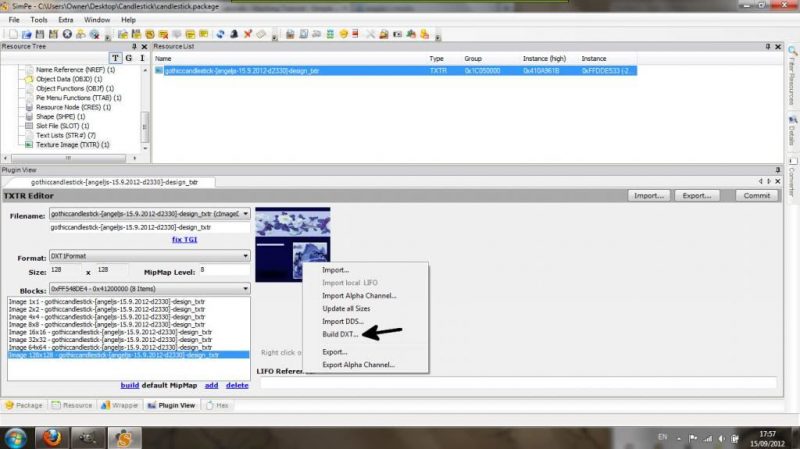
Right-click on the actual image at the bottom right and select ‘Build DXT’:
Open the image you just saved and click ‘Build’:
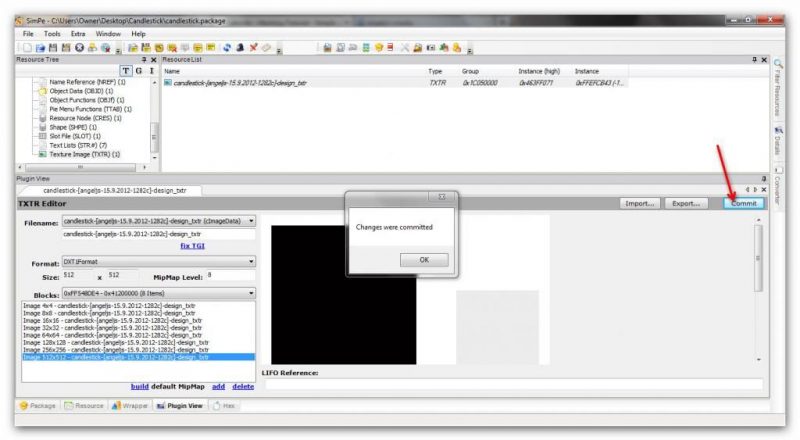
Click the ‘Commit’ button when the process has finished, then click ‘OK’:
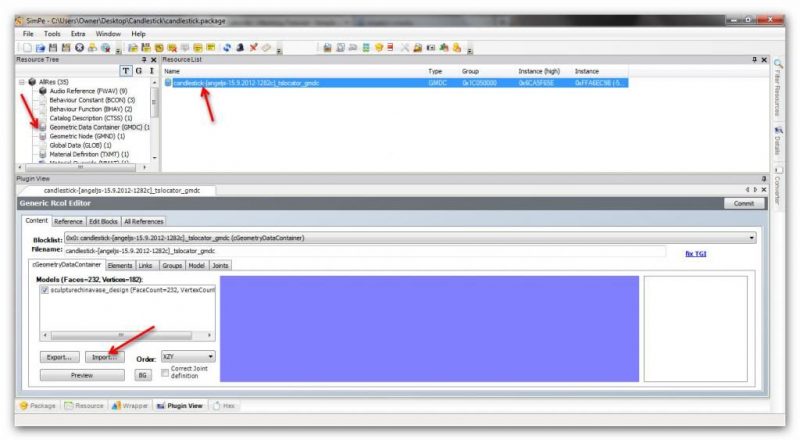
Now to import the new mesh – In the left menu click ‘Geometric Data Container’, then the ‘GMDC’ file. This time, click the ‘Import’ button:
Browse to the map file you saved and import it:
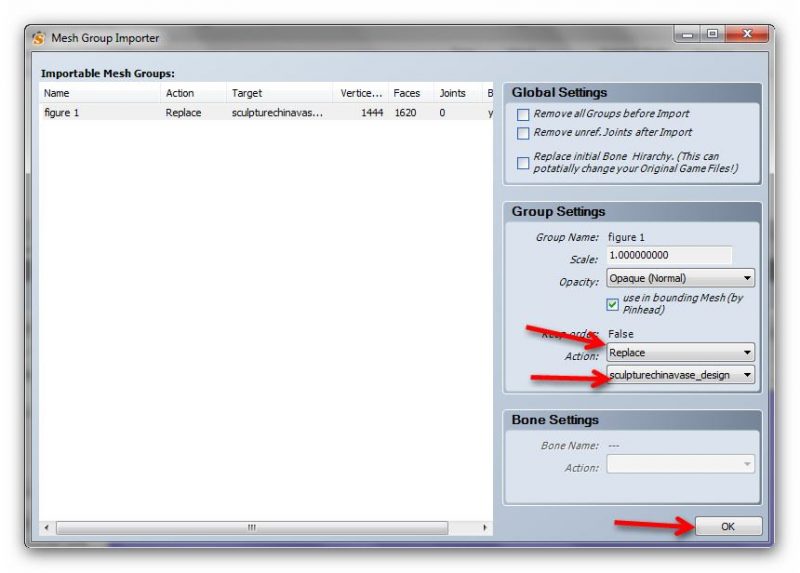
In the box that pops up, you need to select ‘Replace’, then select the file, then click ‘OK’:
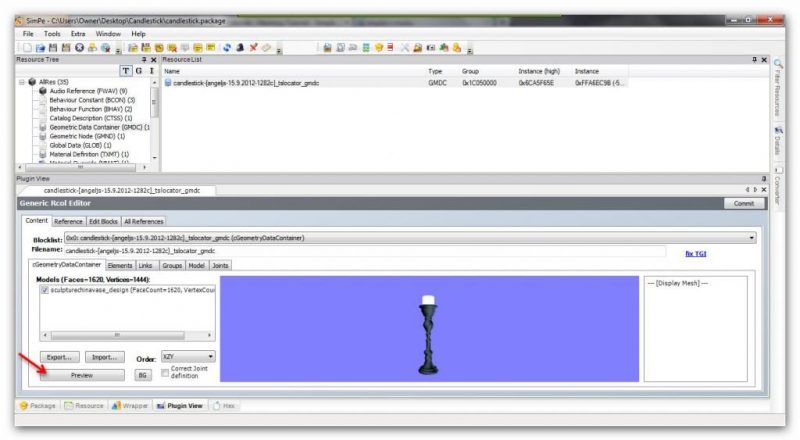
Now you can preview your new mesh if you want:
Looking good? I hope so. Commit the changes.
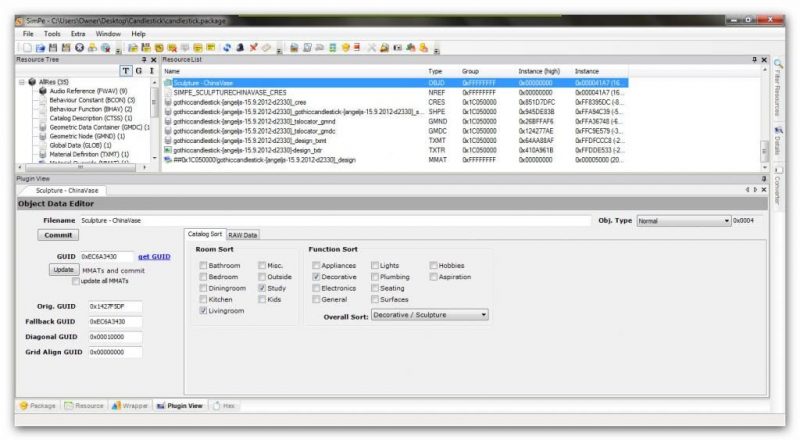
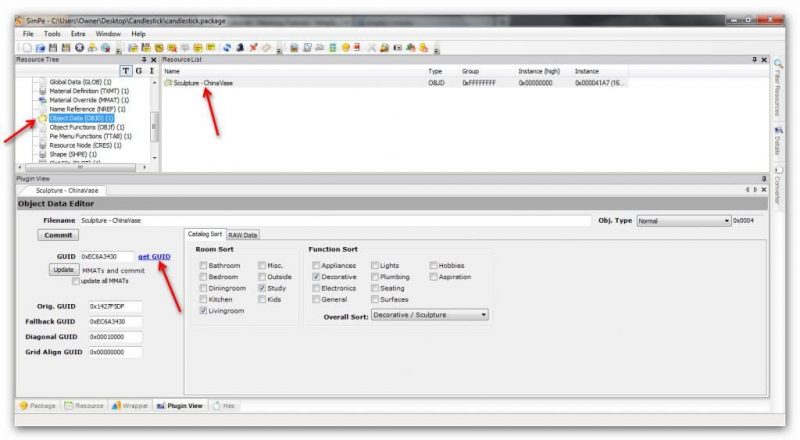
Now we need to make sure the file has it’s own GUID so it doesn’t overwrite anything in your game. For this we need to click ‘Object Data’ in the left menu. In the resource tree, notice we only have one file to change, so this is how we do it. Click on the file, then click ‘get GUID’:
If this is your first time, you need to create and register a new username and password. Once you’ve done that, click ‘Register Object’:
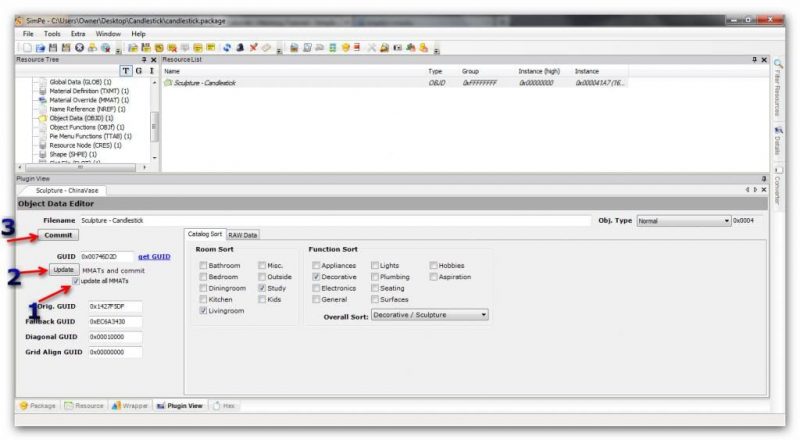
Now tick the box ‘update all MMATs’, then ‘Update’, then ‘Commit’.
Important note: Only for the main file do you tick ‘update all MMATs’. If there were any other files in the Resource List that needed changing, we’d go through this process for all of them, but leave the box unticked.
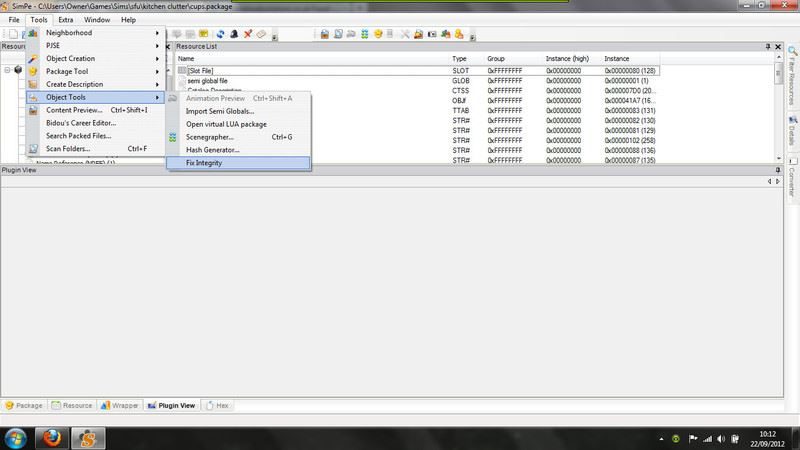
Then you need to fix integrity: ‘Tools/Object Tools/Fix Integrity’:
Now save your file:
At this point I would also ‘save as…’ to my Sims 2 downloads folder so I can test it in game:
Let’s see what that looks like in-game!
Testing the mesh
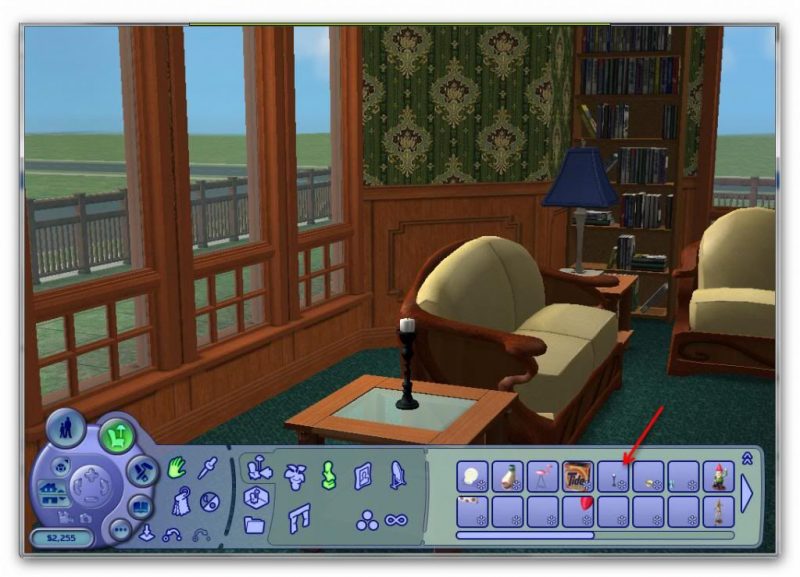
Now fire up your game and enter a house. See if your new mesh shows up in the catalog under ‘Decorative’, ‘Sculpture’:
Congratulations! I hope you found this tutorial easy to follow, but please ask if you find anything too difficult or if you have any questions.
A quick word about your polygon count. Please read this thread for clarification:
https://www.modthesims.info/showthread.php?t=230733
Your poly count is basically the detail that you add to your actual mesh. Try to add less detail and add more with the actual texture. The polygon count for this candlestick is 1620 which is high for such a small object. However, it has a lot of details, curves and such, which is why.

You must be a logged in member to download this file
















How to add shadows and highlights:
https://www.modthesims.info/showthread.php?t=140780
Fantastic job on this! It’s still incredibly daunting to me, but what I did today was read through the whole tutorial to get an idea of what’s involved. I’m thinking I should try a step a day and then give my brain a rest! If I learn to do this, I will never fail to mention my teacher! Today, I’m going to download all the requirements. I have some but not all.
I think I managed to clone the vase, save it to the desktop, and then export the mesh to the same folder. Brain is exhausted!
Got as far as making an ugly candlestick but got stuck when trying to create the cylinder for the candle. A divided empty screen appeared, didn’t know what to do. Will try later. Your tutorial is really helpful!
Sorry Anne, I’ve only just seen this. If you send me a screenshot of any part you are having trouble with I’ll see if I can help. Don’t give up! 🙂
Yeah! Today’s my 39th wedding anniversary and to celebrate my husband is watching the Mentalist and I will again try this tutorial! Will let you know how far I get this time. I created a sort of pot last time. Tee Hee!
Yahoo! I got the farthest I’ve ever gone but am stumped at the tessalate, triangulate part. I think I selected all and right clicked but the menu doesn’t have what I need.

Ann, I forgot to mention, you must click cube 3 at the top for the tessalate menu to show! 🙁 Sorry about that, but happy anniversary!
https://simfansuk.com/wp/wp-includes/images/smilies/party.gif
Who knows what I’ve done, but think I have colorized my candlestick and saved as bmp. As you can see when I try to click on Build DTX, it isn’t available.

Legacy Nvidia DDS Utilities – Download and install them, just like any Windows program, then start SimPE, select the menu ‘Extra’, ‘Preferences’ and fill in the field ‘Nvidia DDS Tools’ with the exact installation path (you can use the “Browse” button to find the folder where the DDS Utilities are installed).
The option should then show up. 🙂