
 Sims 2 – Beginner’s Meshing Tutorial – Basic Table (Views:
22,359
)
Sims 2 – Beginner’s Meshing Tutorial – Basic Table (Views:
22,359
)
Intro and extraction
SimPE
Wings 3D
UV Mapper
Gimp – Or any image editor you are comfortable with
CEP
Legacy Nvidia DDS Utilities – Download and install them, just like any Windows program, then start SimPE, select the menu ‘Extra’, ‘Preferences’ and fill in the field ‘Nvidia DDS Tools’ with the exact installation path (you can use the “Browse” button to find the folder where the DDS Utilities are installed).
Managed Direct X – Required for working with Sims 2 meshes within SimPE
This tutorial uses all 100% free programs!
Making a simple table is one of the easiest things to create. We’re not going to do anything fancy with the design, it’s just going to be a plain, 1-tile, square table with rectangular legs. This tutorial is for absolute beginners and is just to get you used to the process, so I suggest you follow the entire tutorial a few times until you get used to what’s involved.
If at any time you need to stop, or find yourself getting frustrated, or if something just won’t work for you, stop, take a break and come back to it later. You will begin to hate meshing if you don’t, and you should love it! 😀
Okay, here goes:
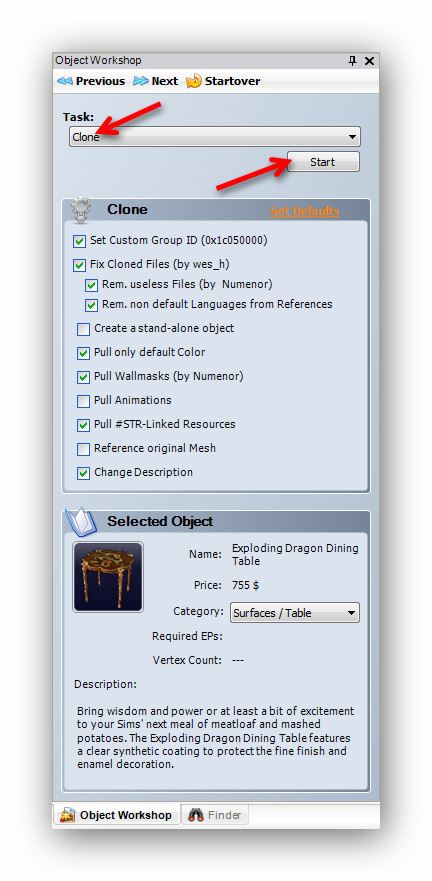
First of all, we are going to clone an object from which we can extract the mesh (3D file) to work with. As we are going to create a table, we need to clone a table so we have the proper dimensions and behaviours without having to do much to it. So, open up SimPE and, if you haven’t done so already, change the settings so that only the base game objects show. This is so the object we create will be base game compatible.
From the top menu, select ‘Extra’ then ‘Preferences’. In the box that pops up, click ‘File Table’ and make sure only ‘Include CEP’ and ‘Include Original’ are selected:

You also need to make sure SimPE knows where you installed DDS Utilities. You can do this by clicking ‘System Folders’ in the same box and browsing to the utilities:

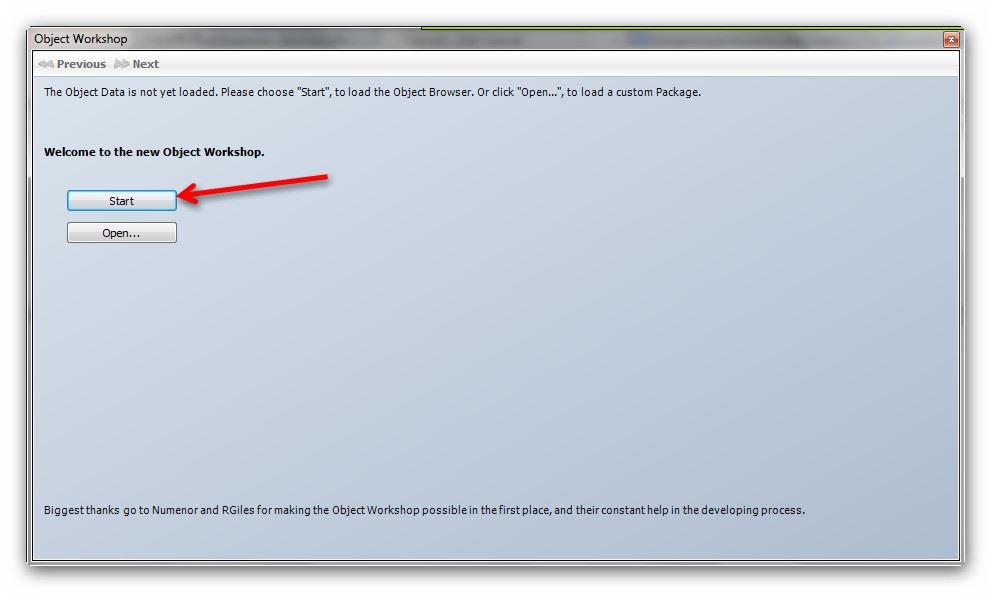
Now that’s out of the way, we can begin properly. Click ‘OK’ and open the ‘Object Workshop’ if it’s not already showing in SimPE:
You can also get to it by the top menu: ‘Tools/Object Creation/Object Workshop’. Click ‘Start’:
We need to select categories by clicking the little crosses next to each one to open them. Click ‘Surfaces/Tables’ and select the Exploding Dragon Dining Table:

At the top of the box click ‘Next’, then on the next page make sure ‘Clone’ is selected, then click ‘Start’:
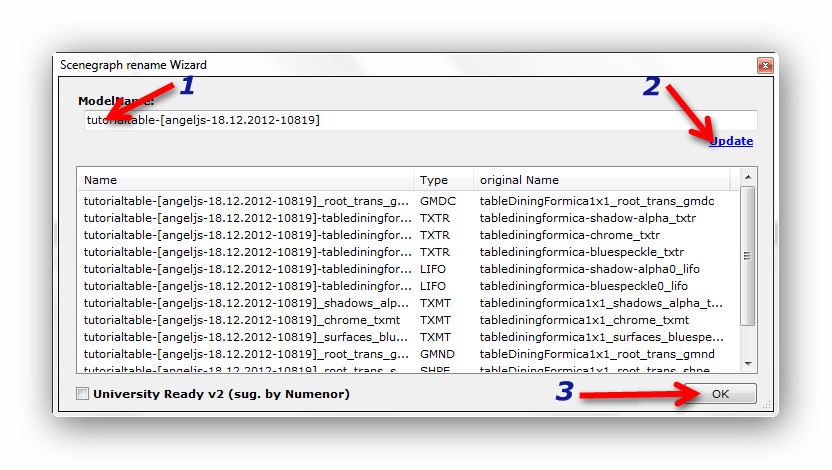
Give it a name, price and description, then click ‘Finish’ at the top of the window:

Change the first part of the name, click ‘Update’, then ‘OK’:
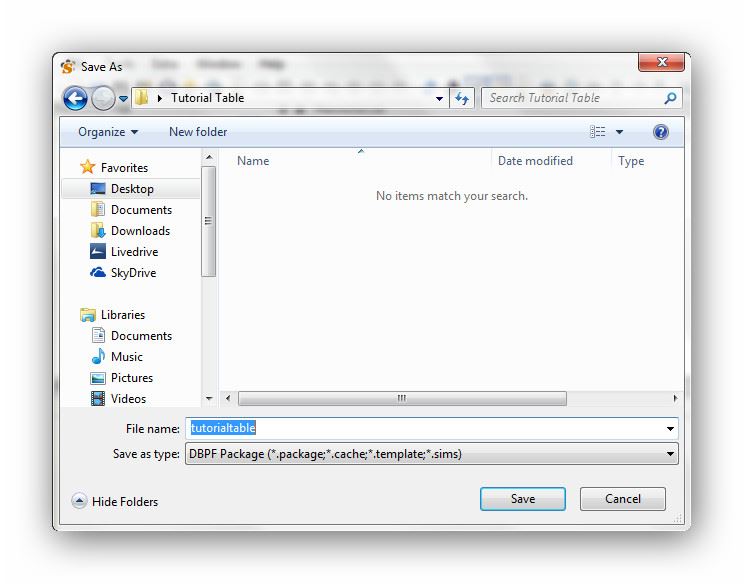
Now you need to save the file where you can easily find it again. I created a folder on my desktop called ‘Tutorial Table’ and saved the file there:
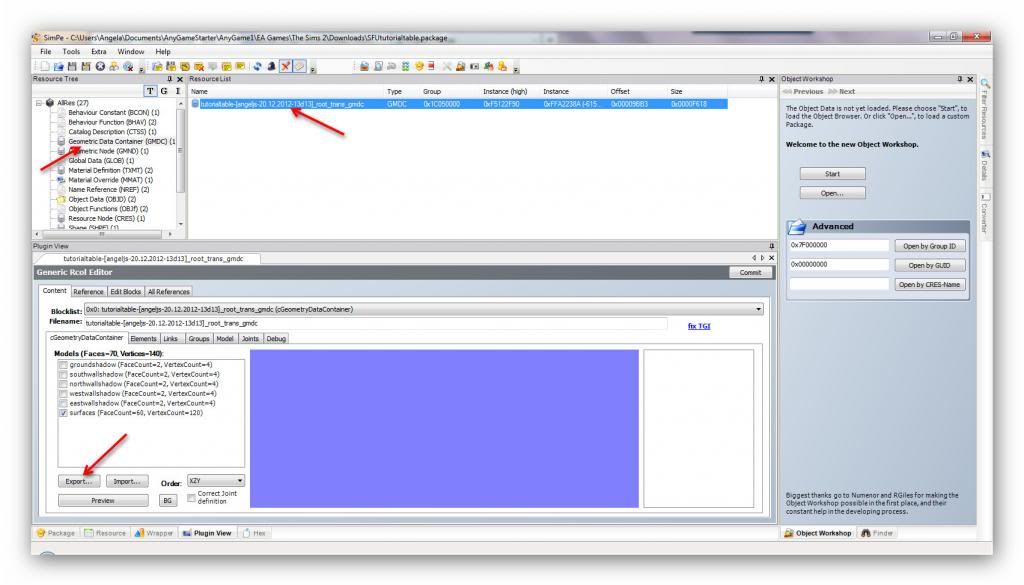
SimPE will now show all the files associated with the table we just cloned. The mesh file is located under ‘Geometric Data Container’ in the left menu page. So click it, and click on the file on the right. At the bottom, click ‘Export’:
And save it to the same folder:

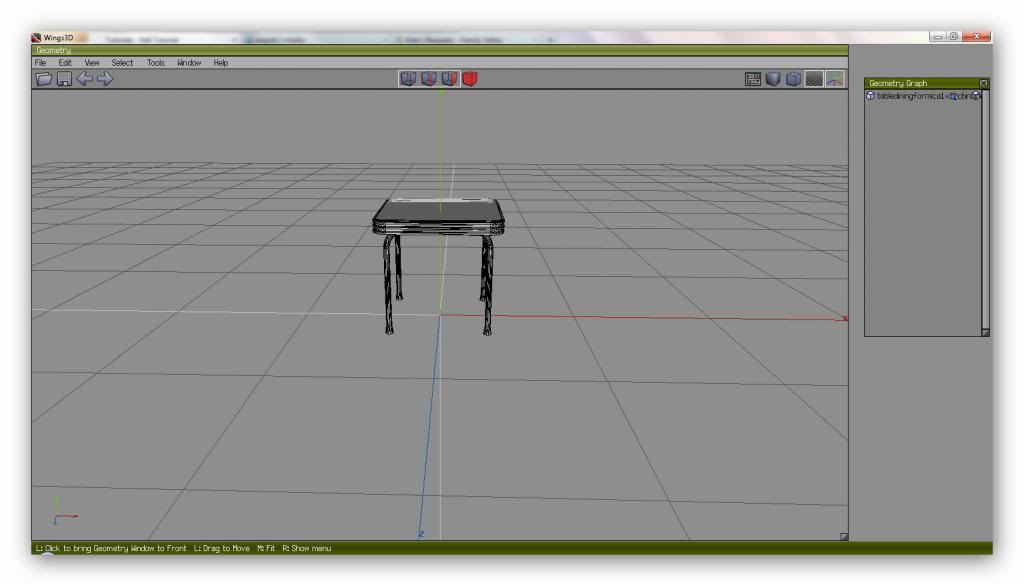
You can now close down SimPE and open up Wings 3D. Import the mesh file you just created – ‘File/Import/Wavefront(.obj)’:

Browse to the folder you created and import the file, and you should end up with something like this (I cloned a different table so yours will probably look different):
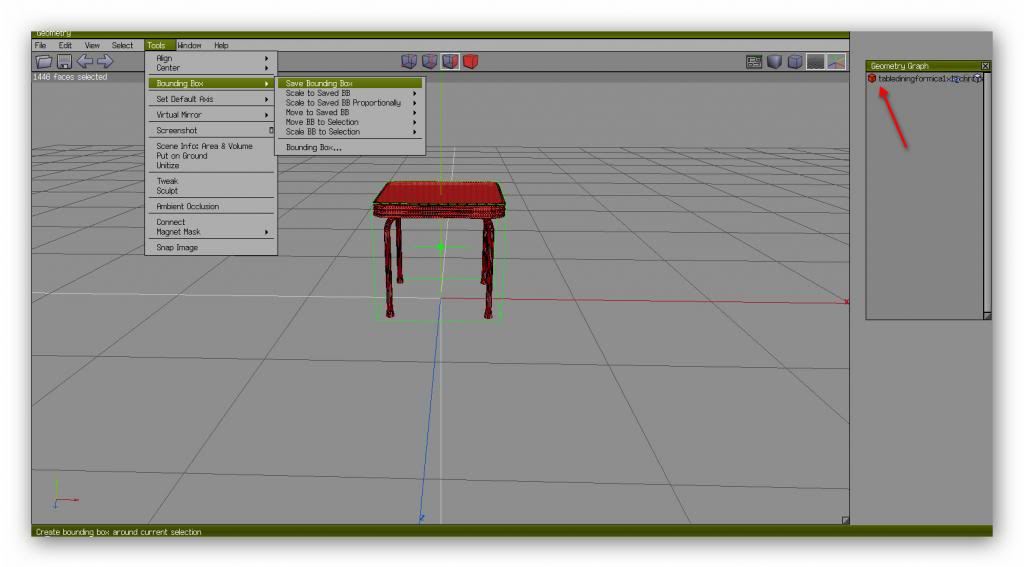
Select the entire thing by clicking on the little red box in the Geometry Graph window on the right. If you don’t see it, you can open it from ‘Window/Geometry Graph’ in the top menu. Now click ‘Tools/Bounding Box/Save Bounding Box’. This will place a green box around the item. This is so we can create the table using the same dimensions as the original. If we don’t do this, the table may be the wrong size, and our Sims items may sink into it or float above it when placed on the table!
Creating your mesh
Now we have our bounding box, we can safely delete the table that we have just imported. Do this by right-clicking on the item on the geometry graph and selecting ‘Delete’: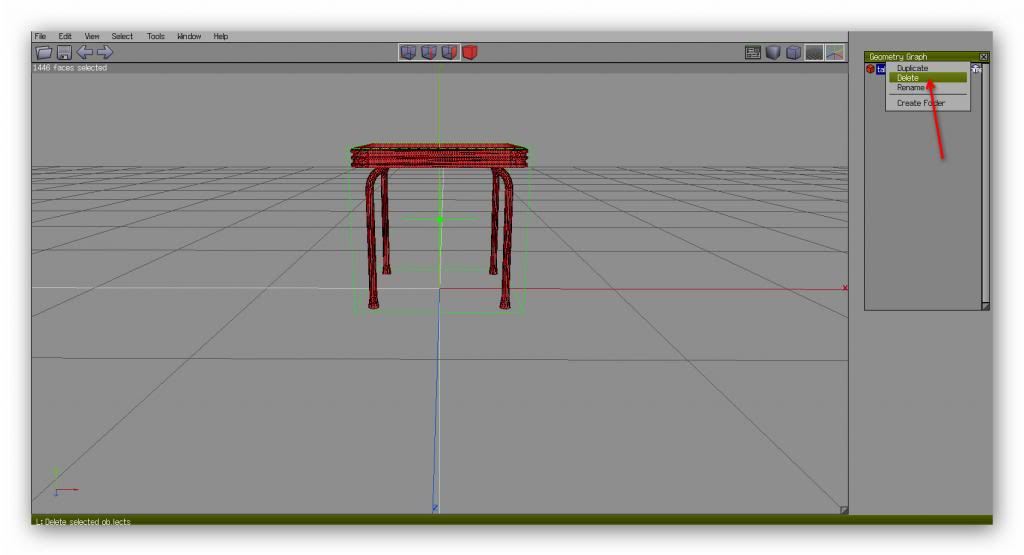
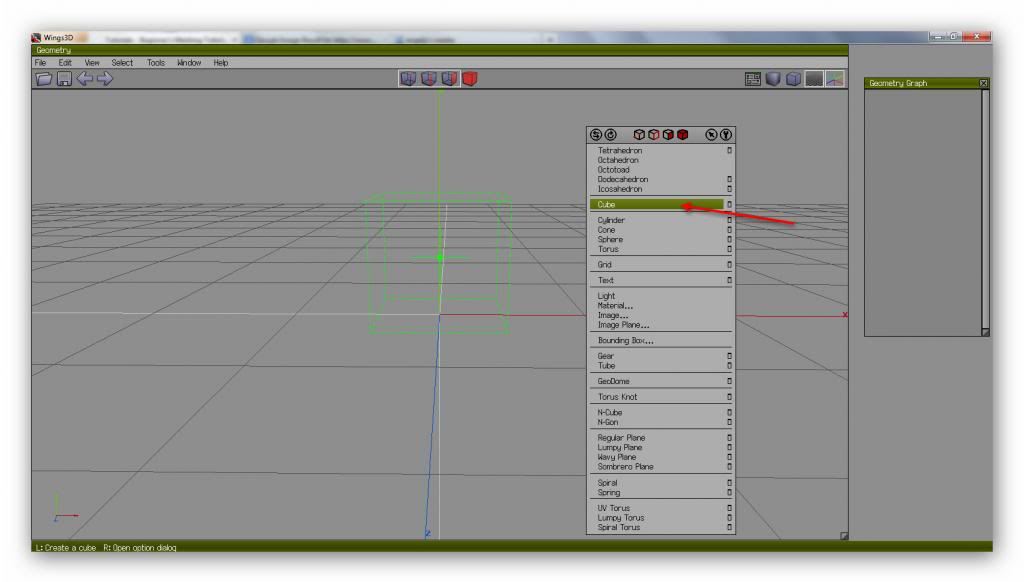
Now we are just left with the bounding box which will be our size guide. Right-click in the main window and select ‘Cube’. This will be the table top:
Note: If you do not have a scroller on your mouse, you are going to have to use the hotkeys. You can find these in the ‘Help’ menu at the top.
Rolling the scroller allows you to zoom in and out. If you click the scroller, you can move around the object quite freely. Just click the left button to get back to normal. If you keep the scroller pressed, you can move the view from side to side. It’s up to you to get used to using the mouse and/or keys with the software, but there are tutorials around to help:
https://www.wings3d.com/paulthepuzzles/aardvarks.html
https://www.wings3d.com/wiki.php?title=Community
The bounding box also serves another good purpose. We can add shapes and constrain them to the box dimensions. So that’s what we’ll do. But first of all, a quick word about the little cubes at the top:

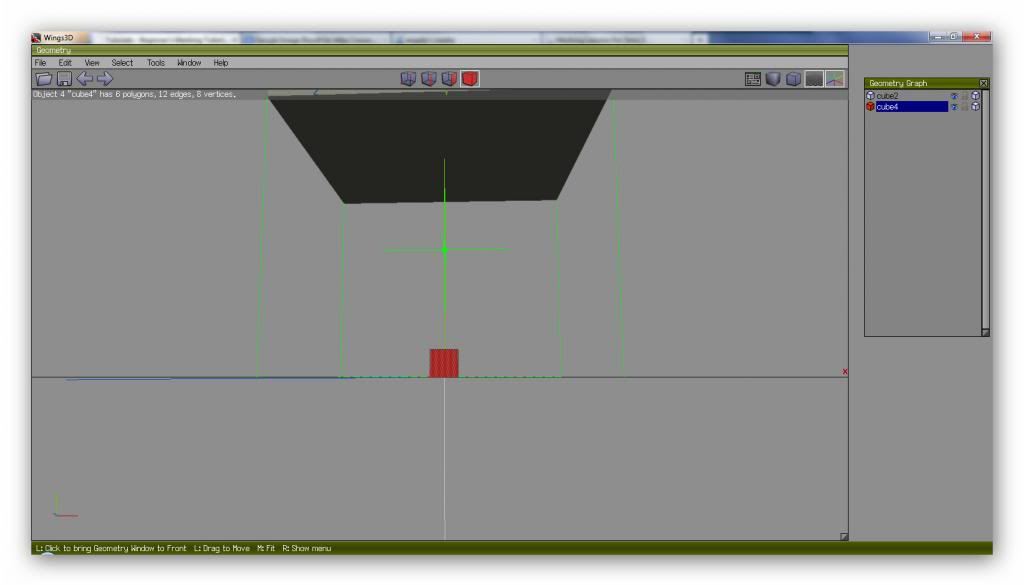
I’m going to call these cube 1, cube 2, cube 3 and cube 4. Cube 1 will show you the vertices, or connecting points, on the object. Cube 2 shows you the lines, cube 3 lets you select single faces, and cube 4 selects all of the object.
Now that cube we just created is far too big. We need to resize it to fit the bounding box. To do this, select the whole thing, then from the top menu, choose ‘Tools/Bounding Box/Scale to Saved BB’:
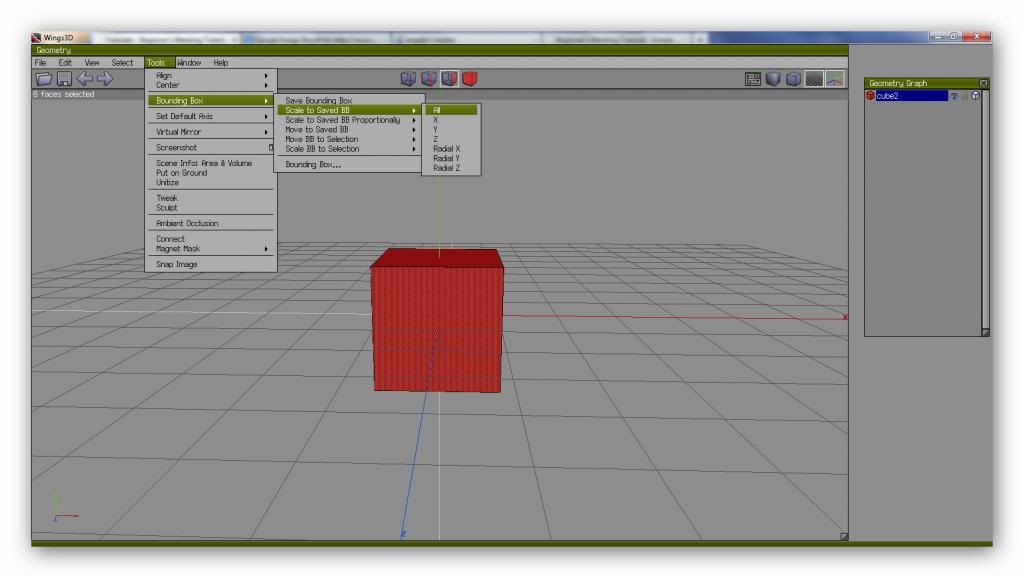
Then with the cube still selected, from the top menu choose ‘Tools/Bounding Box/Moved to Saved BB’. Then you will have the cube the same dimensions as the bounding box:
De-select the cube, then click on cube 3 at the top, and select the very bottom of the cube you created:
As this cube is going to be our table top, we are going to move the selected part up until it’s at the height we want. To do this, right-click in the main window and select ‘Move/Y’. This will move the selected part of the cube upwards. Move your mouse to the left or right until it’s the right size:

We’re not going to do anything fancy with the design, this is just to get you used to the meshing process. We are now going to create the leg, just one for the moment.
Deselect the table, right-click in the main window and create another cube. Select it, right-click and choose ‘Scale Uniform’. Move your mouse left or right to get the leg the width you want:
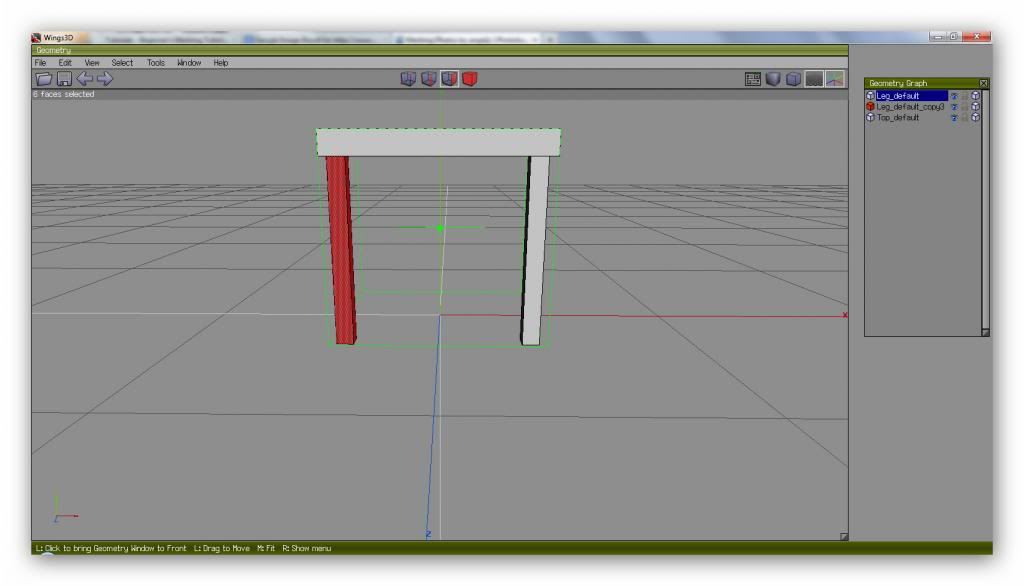
Now to make sure the leg is set on the floor, we need to select the whole thing, right-click and move it ‘Y’ so it sits on the horizontal line where the bottom of the bounding box is set:
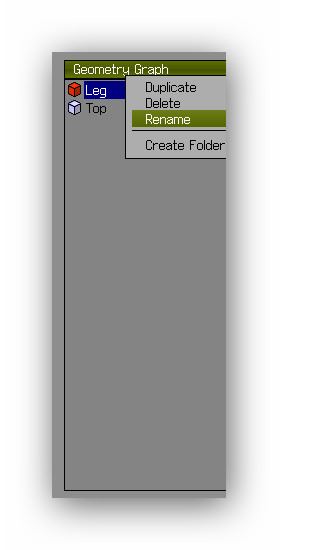
You may have to click your mouse scroller and move the window to get it in the correct position, but once that’s done, we can raise the height of the leg. At this point I’d right-click on each item in the geometry graph to rename them. It just makes it easier to know what each part is:
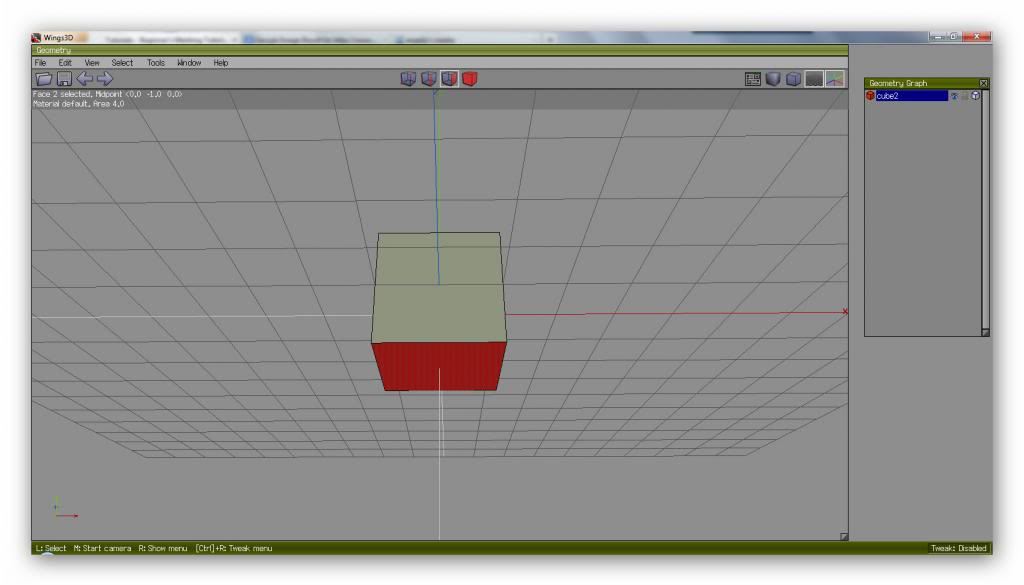
To make the table leg longer, we are going to select the top face, right-click and choose ‘Move/Y’ to move the face upwards. If you click on the little cube next to the table in the geometry graph window, you can hide it. This makes it easier to see when the leg is high enough:
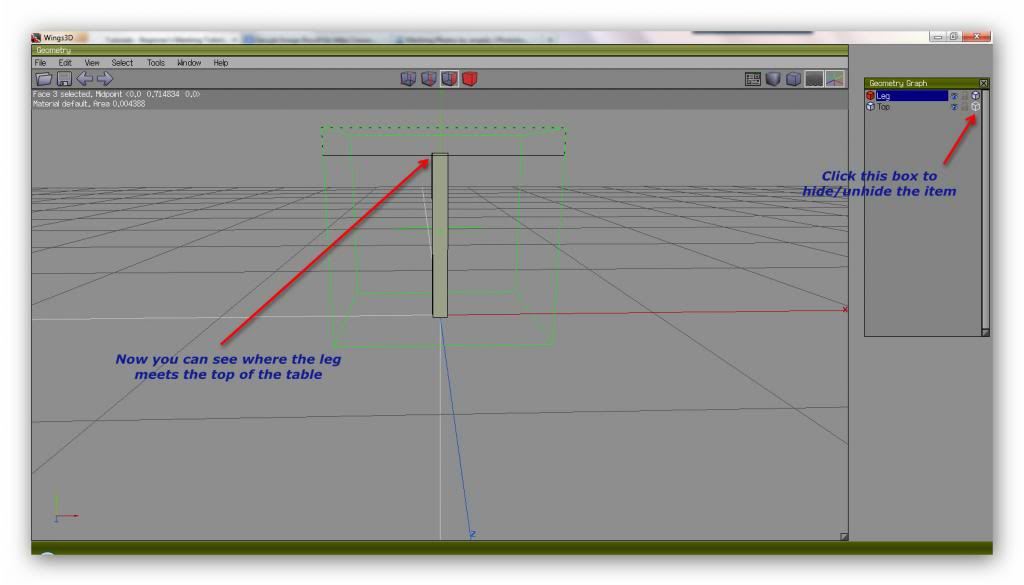
Now, make the top visible again by re-clicking on the little cube next to it’s name. Select the whole leg, right-click and use the ‘X’ and ‘Z’ axis’ to move it into position:
All of the legs are going to be the same, so we only need to map one of them. Therefore, we are going to map the item now before we create the other legs. Mapping tells the game where to apply the texture to the item.
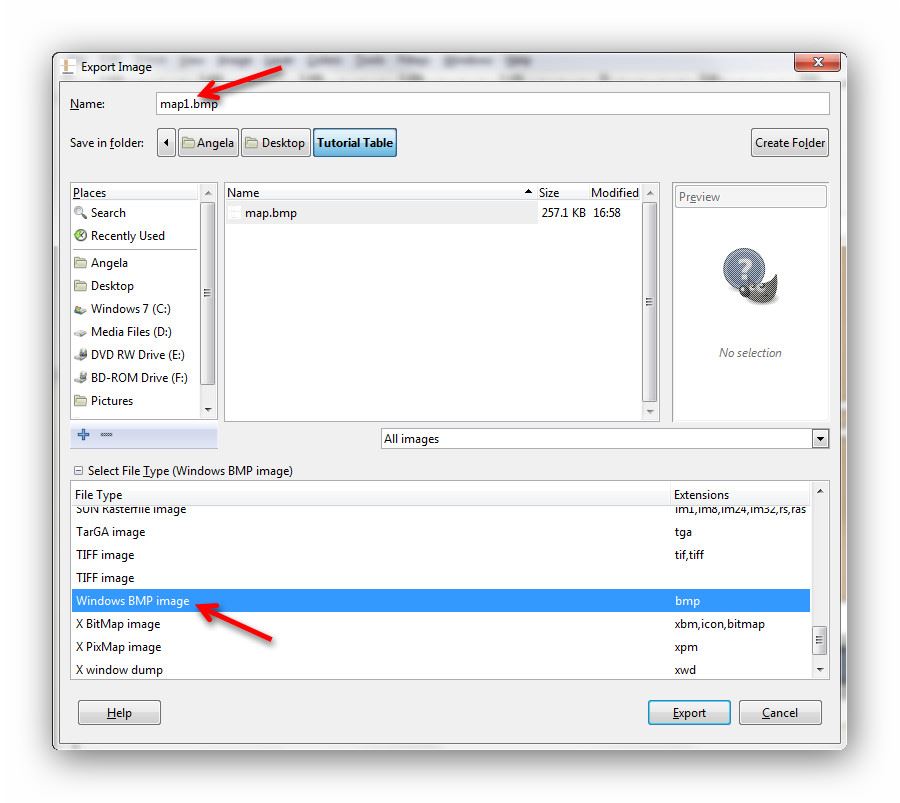
From the top menu, select ‘File/Export/Wavefront (.obj)’ and export the table mesh, giving it a different name if you like. Then do the same again, this time calling it ‘Map’ or ‘Tablemap’ or something similar. Then if something goes wrong with the mapping we have the original file to work with.
Now for the mapping…
Mapping the mesh
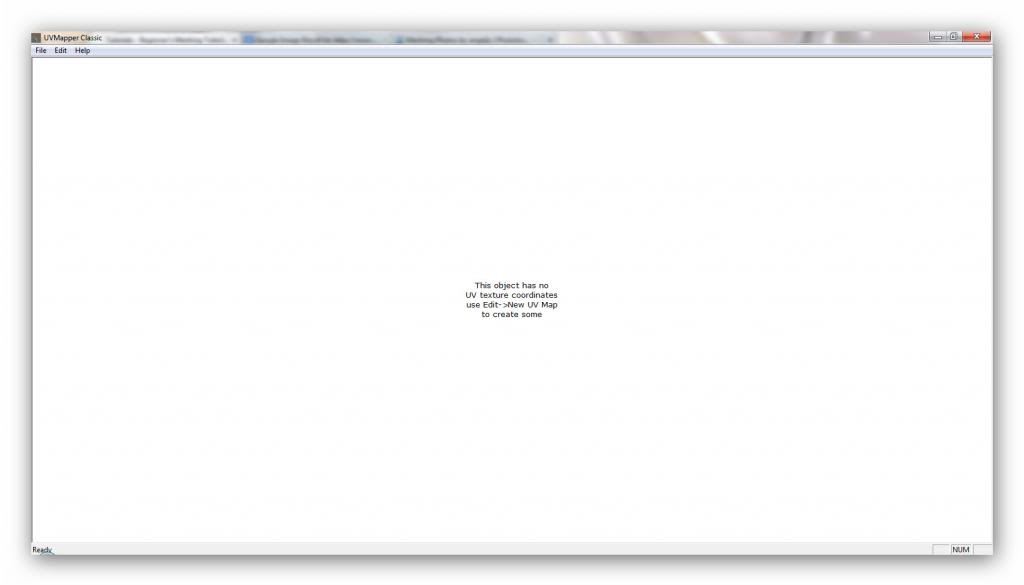
This is always the tricky part, because if the mapping is wrong, the texture will look wrong in the game. If you are serious about mapping and can afford UVMapper Professional, then I recommend you purchase it. However, for this tutorial, we’ll be using the Classic (free) version.
Leave Wings 3D open, and open up UVMapper:
From the top menu, choose ‘File/Load Model’, and choose the file you saved as the map. Leave the options as they are, and when opened, your program should look like this:
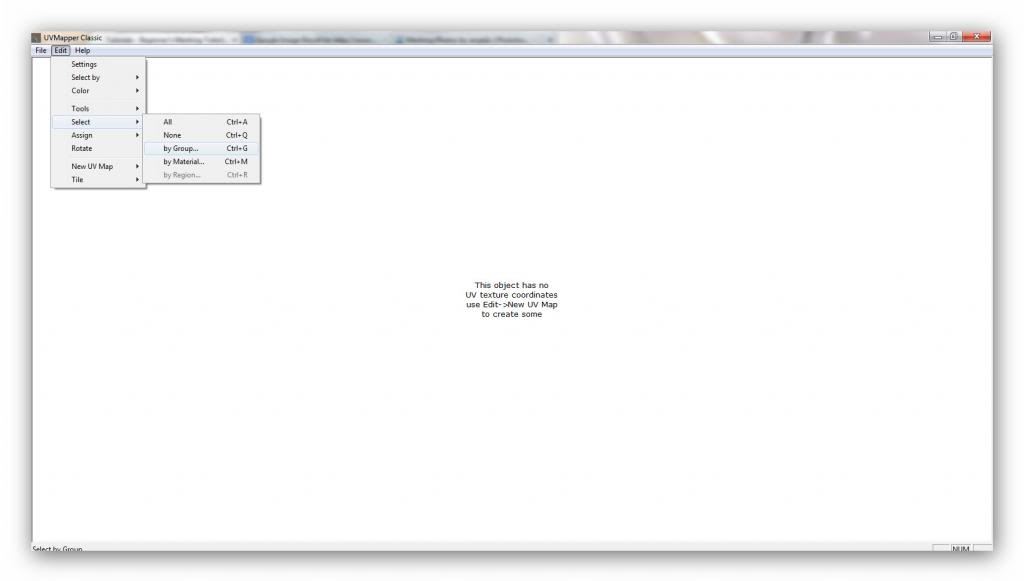
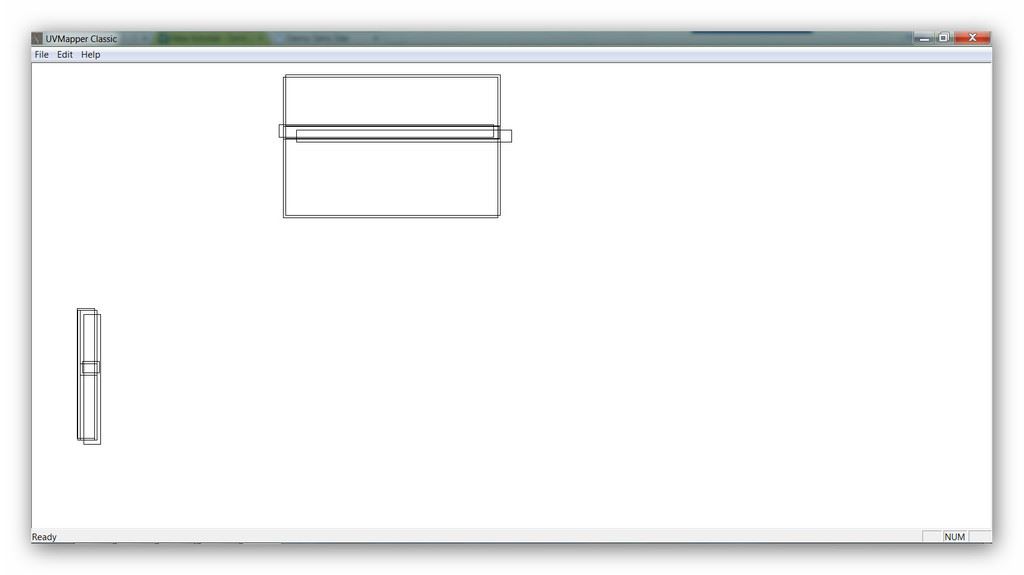
From the top menu, choose ‘Edit/Select/by Group’ and select the first file that shows:
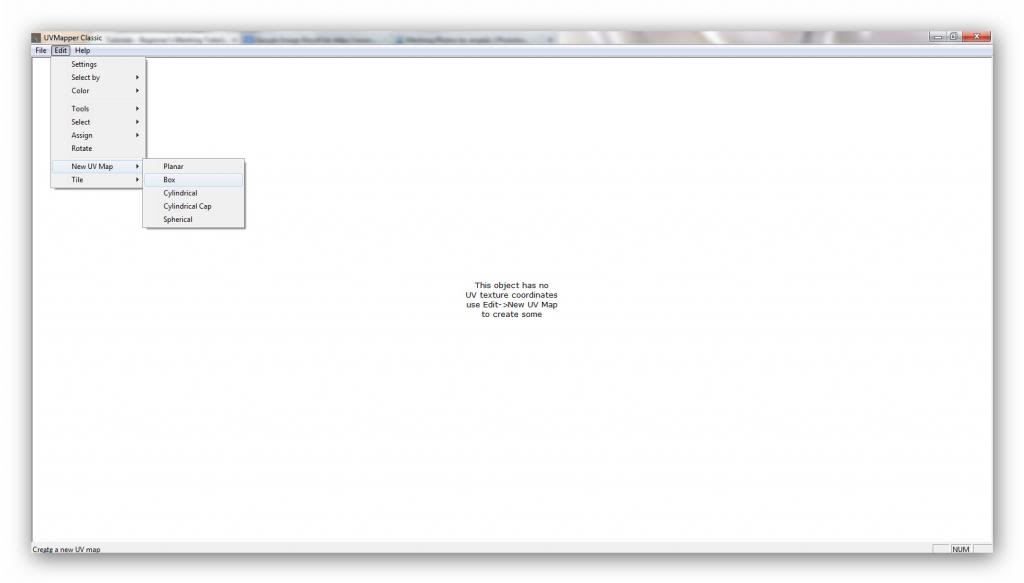
Then ‘Edit/New UV Map/Box’:
Change the map size to 512 and leave the other settings as they are:
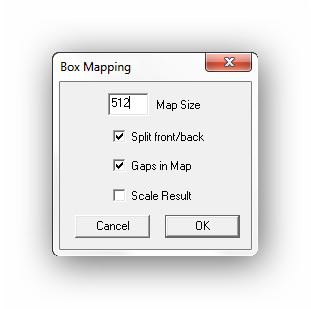
Now you should see something like this:

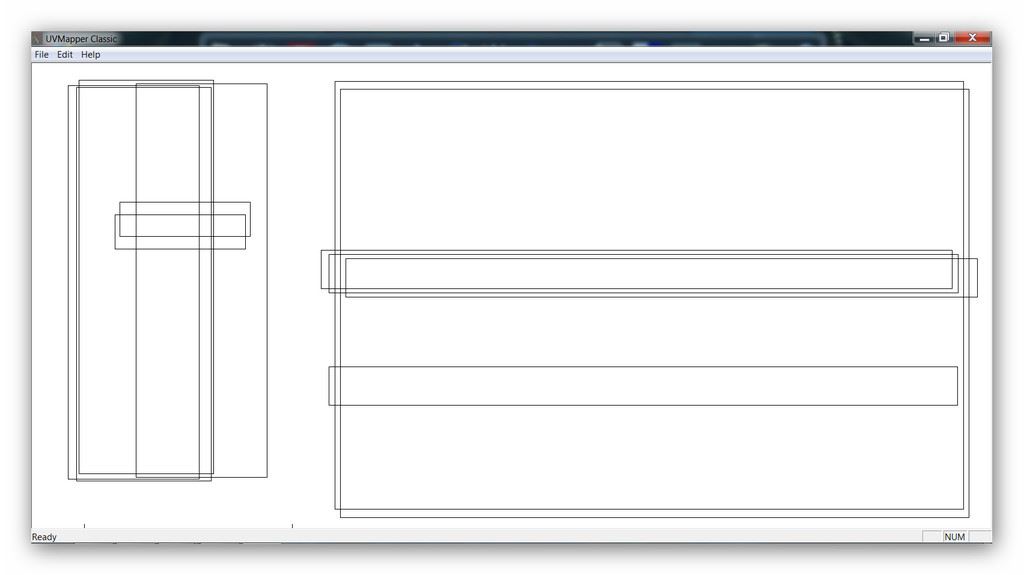
Now, do that again to map the table top and then you can resize that section and move it to the top of the page:

Now map the leg the same way. Select by group and map as a box. Now you can resize and move both parts by selecting them until you end up with something like this:
Notice that I’ve moved the parts that are going to have the same texture on top of one another. This means we can now resize them as 2 parts until most of the window has been filled. This will mean better texturing if they are kept to the same shape and proportion as they originally were:
I have to tell you at this point that a lot of the time, mapping is a matter of trial and error and/or experience. It’s never been my strong point, which is why I prefer UVMapper Pro…you can apply a a texture at the time of mapping to make sure it looks right. If you finish creating your object and the texture looks stretched in the game, you will have to do it again.
The most important thing to remember is that the proportions need to be kept as much the same as you can when resizing the parts. Don’t make them too thin or too fat, and keep the parts in proportion to each other. I had a lot of advice on mapping here:
https://www.modthesims.info/showthread.php?t=486254
Hopefully you’ll find it easier to pick up than I am!
Note that if any parts of the mesh are going to have the same texture, you can move them on top of each other. This will free up space on the map, which you can then fill by resizing the different parts. The more of the image you take up, the sharper the texture will be.
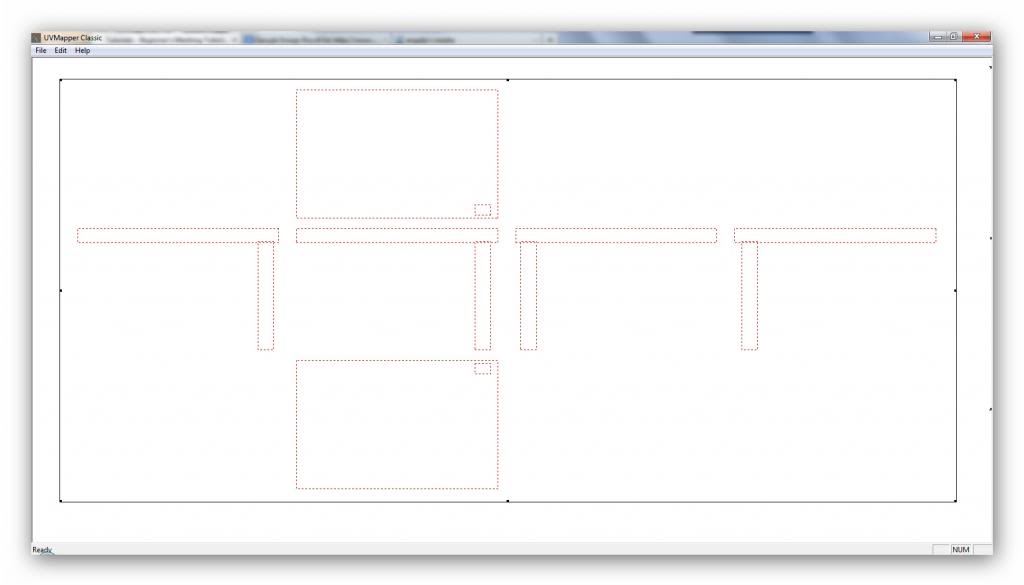
However, if you wanted to be lazy and only wanted to use the same texture for the entire table, you could select all instead of by group and map the whole thing at once, as a box. Then you’d end up with this:
But do practice the mapping of each item separately as it’s excellent practice and will get you used to the process.
No go to ‘File/Save Model’, leave all options as they are and overwrite your map file. Then go to ‘File/Save Texture Map’, set the map size to 512×512 and leave the other options as they are. Save it to the same folder.
Now, back to Wings 3D. Click ‘File/New’ and DO NOT save! If you do, you will end up with 2 meshes overwriting each other! Now import the map you just saved in UVMapper.
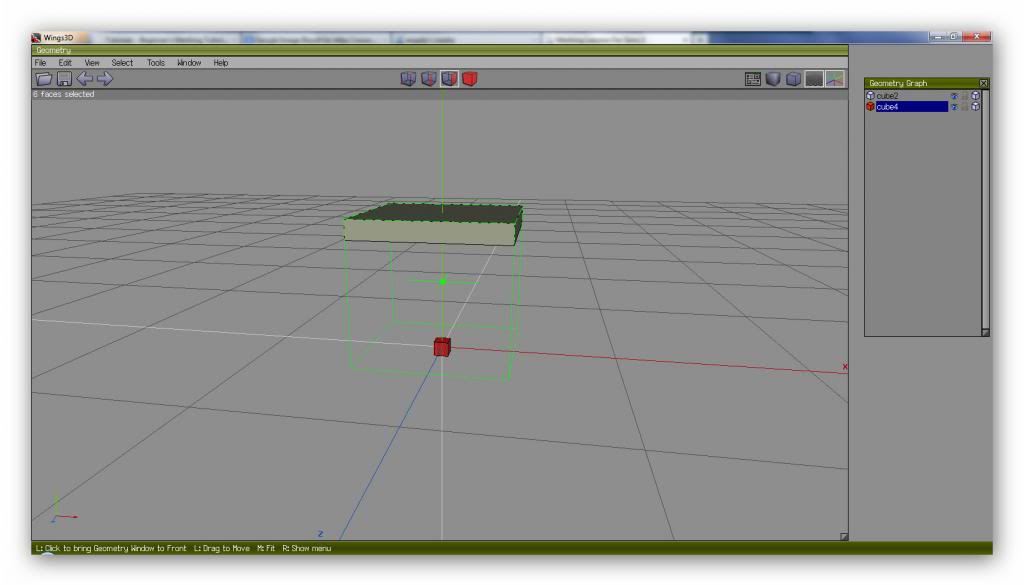
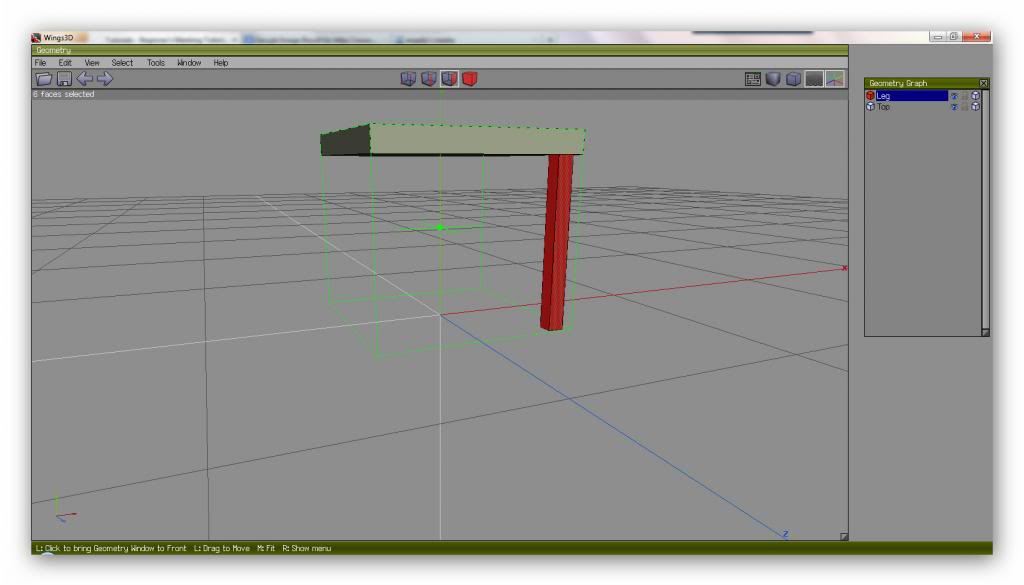
Instead of creating each leg at a time, we are simply going to duplicate the one we already have. Right-click on the leg name in the geometry graph window and select ‘Duplicate’. Now select the new leg, right-click in the main window, and move ‘X’ to position it like so:
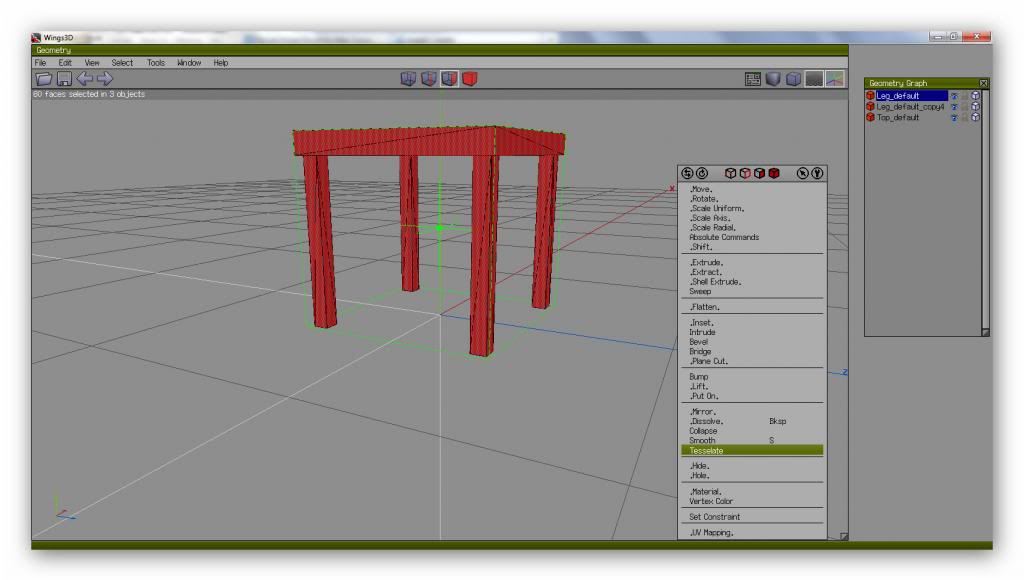
Click cube 4 at the top, select both legs, right-click in the main window and select ‘Combine’:

The two legs have been combined into one part. Duplicate this part, select the new one, and move back using ‘Z’, so you end up with a 4-legged table:

Select cube 4 at the top again to select the whole table, then click cube 3, right-click and choose ‘Tesselate/Triangulate’. Apparently this is very important to the game:
Make sure cube 4 at the top is selected, right-click and click the little box next to ‘Auto-Smooth’:
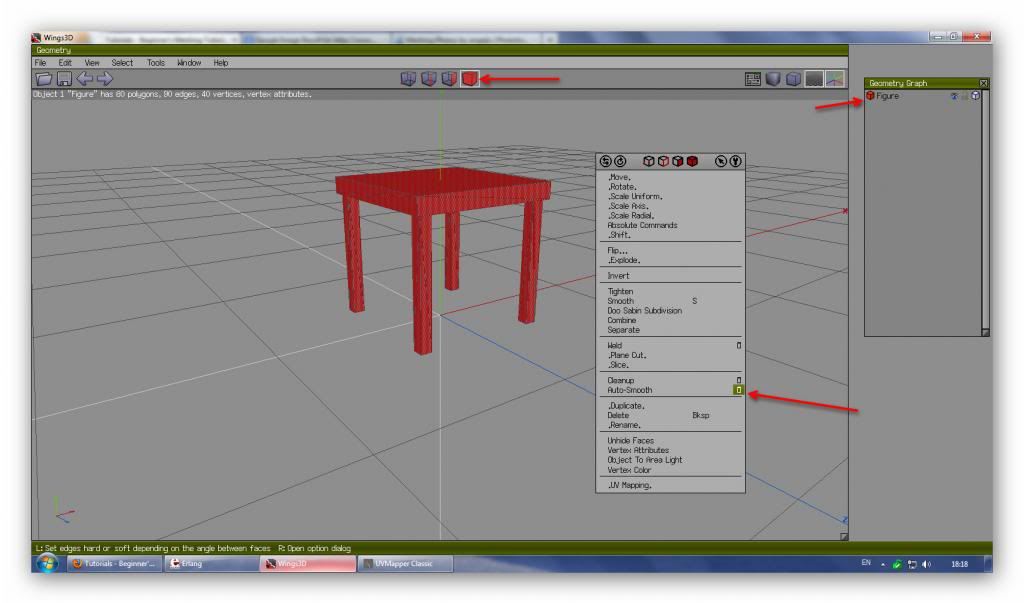
Click ‘OK’ and see how much more defined your table looks now:

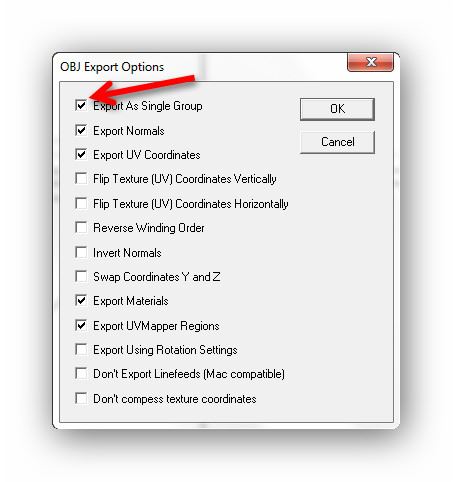
Export over the map file again, and load the model in UVMapper and save it again, but this time save it as a single group:
You can now close down both programs.
Now to apply the texture…
Adding texture
Open up Gimp and SimPE. In Gimp, open the texture map you saved with UVMapper: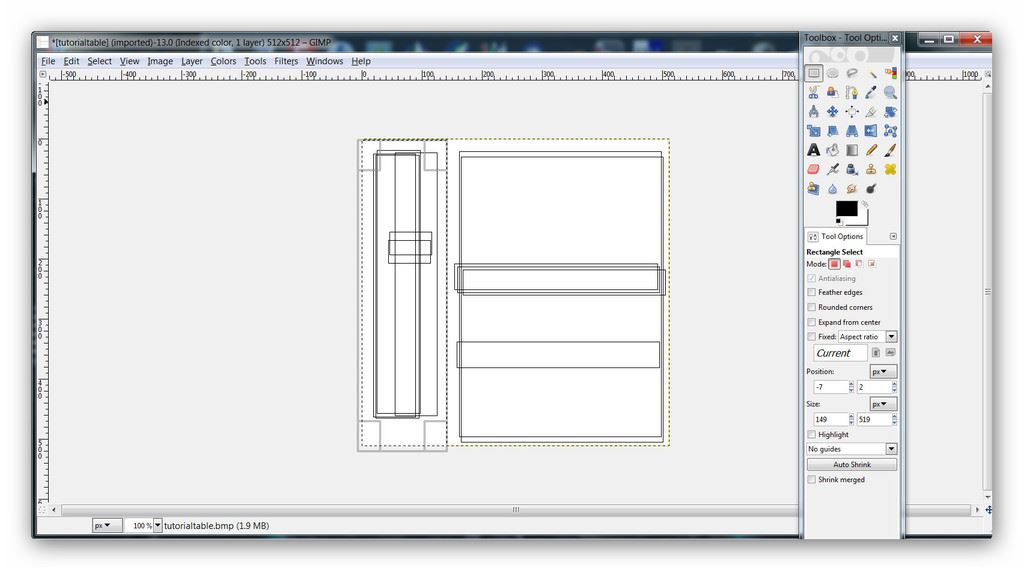
For the sake of quickness, you can fill the whole image with a texture or solid colour, but because we’ve mapped the table and legs separately, we’ll add different ones to each, just to show how clever we are! 🙂
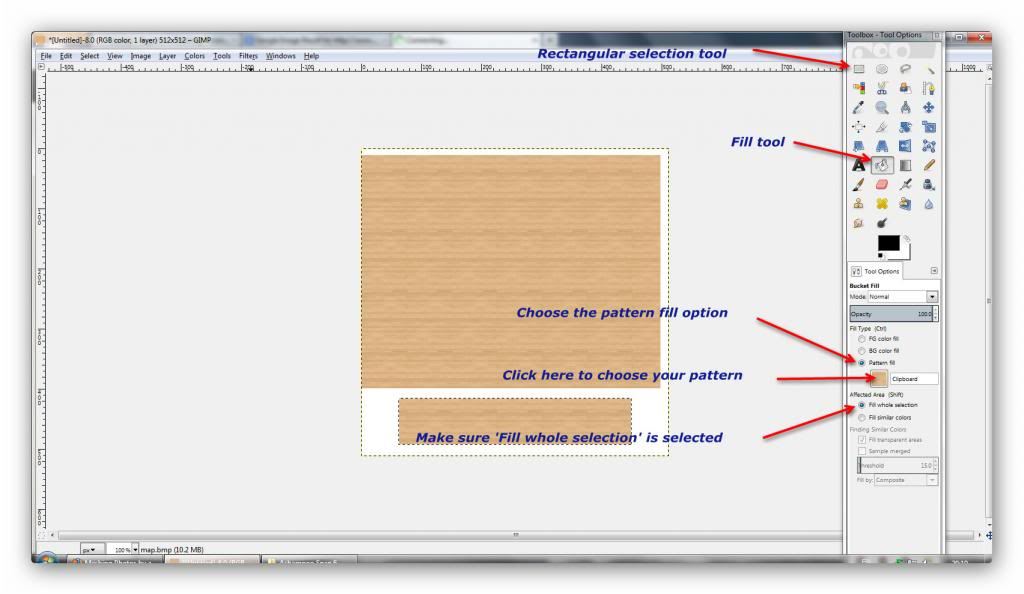
I found some seamless wood textures by doing a Google image search. You can select each part of the texture by using Gimp’s rectangular select tool then fill it with colour or copy and paste a texture image over it.
What I did was scale down a texture image (‘Image/Scale Image’), then selected it (‘Select/All’) and copied it to the clipboard (‘Edit/Copy’):

I then selected the region I wanted to fill, with the rectangular select tool. Then I chose to fill that part with the pattern I had copied to the clipboard, then clicked on the section of the image I just selected to fill it:
You can fill the whole image with a pattern or a colour, you can add shadows and shading, using layers etc., but advanced image editing is beyond the scope of this tutorial. For the legs, I filled them in the same way, then kept them selected so I could adjust the colour using the ‘Hue-Saturation’ tool from the ‘Colors’ menu:
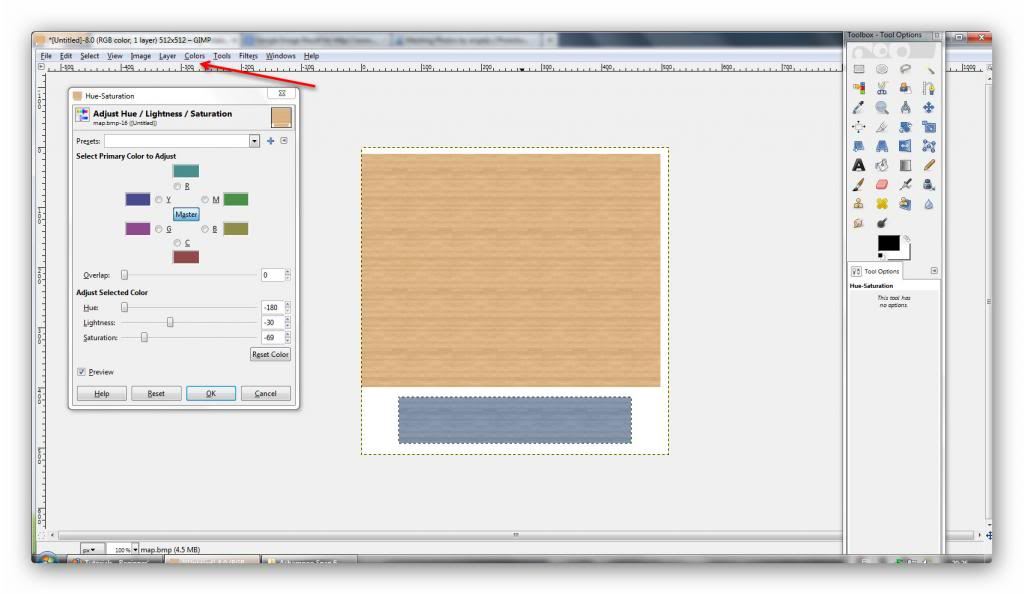
You don’t have to do this, of course, it’s just another way of recolouring items. You can also use a completely different texture image if you prefer, but I just changed the colour of mine.
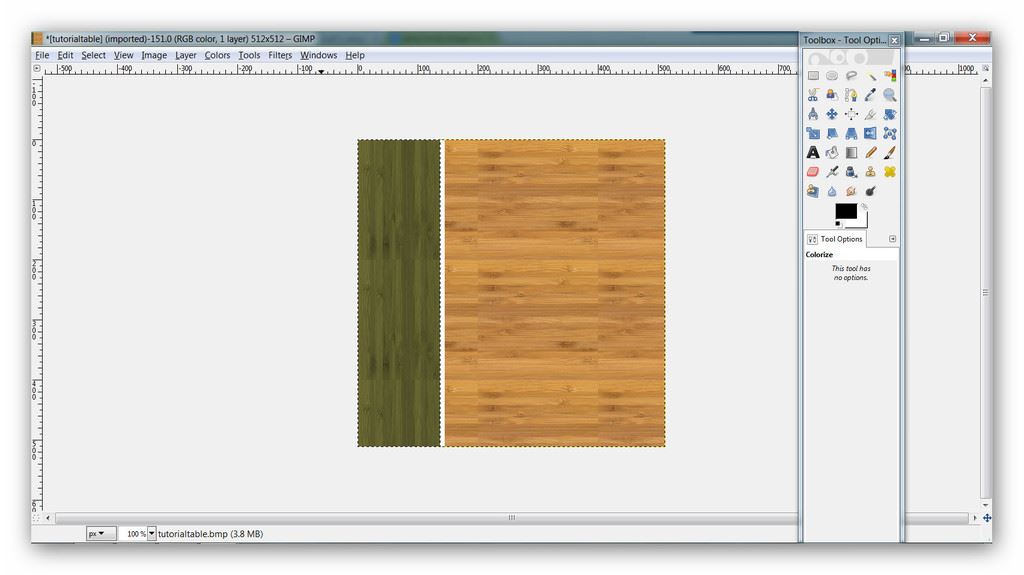
This is the newer version of my mapped image with a new texture map:
Once your image is how you like it, select ‘File/Export’ from the top menu and save your file as something different so you don’t overwrite your original texture file. You may need it for more complex texturing, or you may want to include it with a download so others can recolour it:
Now we need to bring all of our hard work together in SimPE!
Import and create
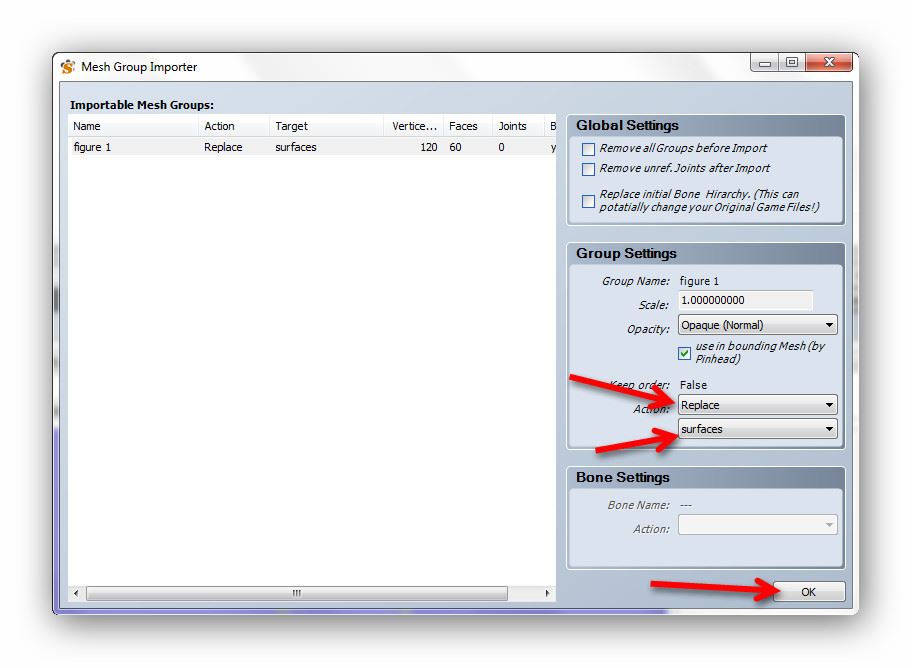
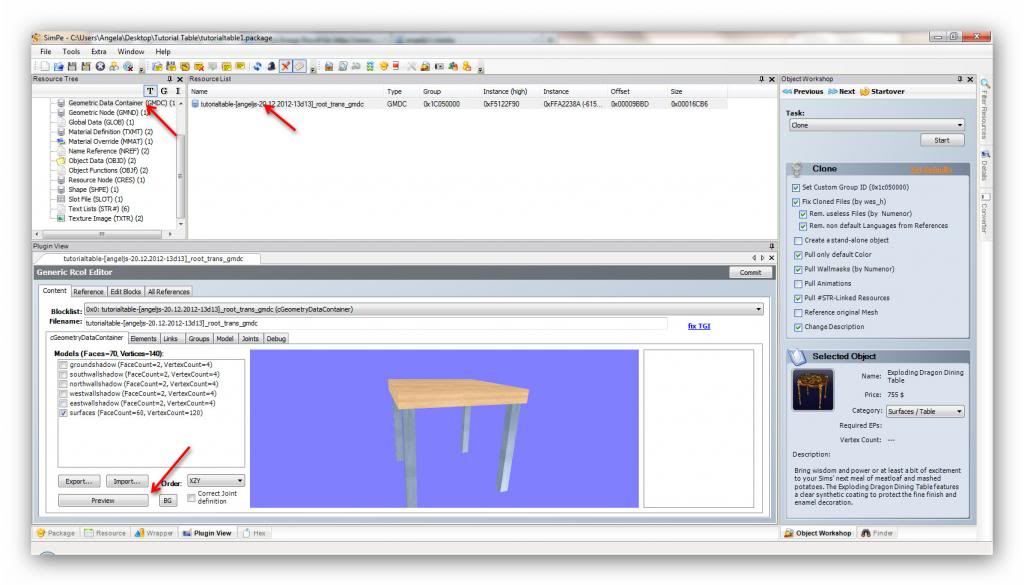
In SimPE, open the file that you saved earlier, in the same folder you created for this project. Select ‘Geometric Data Container’ from the left window, and click on the file in the right window. This time import the mesh file you mapped: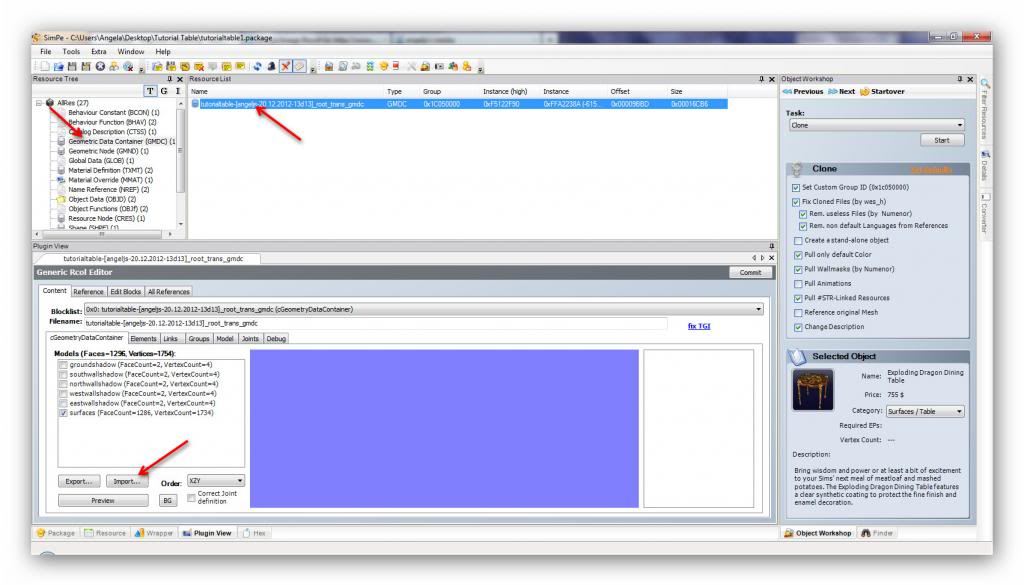
In the box that pops up, select ‘Replace’ and ‘Surfaces’:
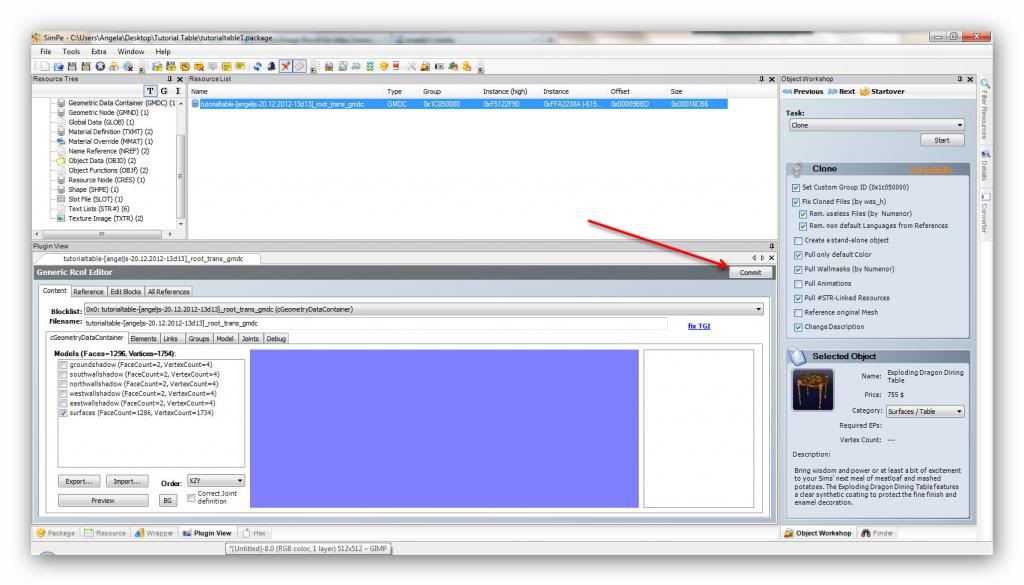
Click the ‘Commit’ button.
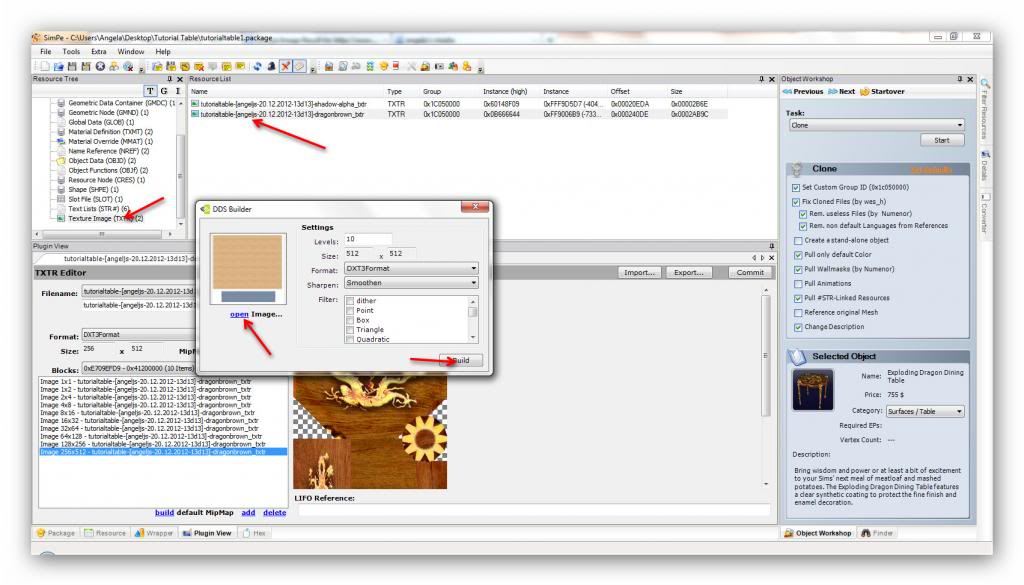
Next, select the image texture, right-click on the image in the bottom window, select ‘Build DXT’, browse to your saved texture image and then click ‘Build’.
Click ‘Commit’. Now, go back to the GMDC file and click ‘Preview’ to view your new table:
I can tell by this image that I haven’t mapped the legs properly, they should have been thinner in UVMapper, but never mind, it’s all practice!
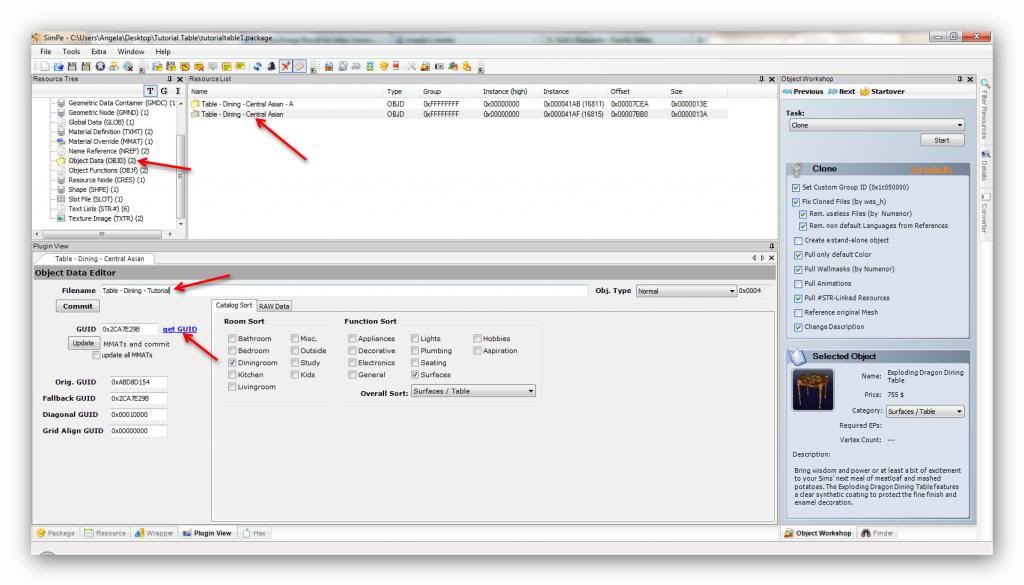
Anyway, to make sure your new item doesn’t overwrite anything else in your game, we need to give it a new GUID. To do this, select ‘Object Data (OBJD)’ from the left window. You can see from the right window that we have 2 files to modify. Select the main one, change the last part of it’s name and click ‘get GUID’:
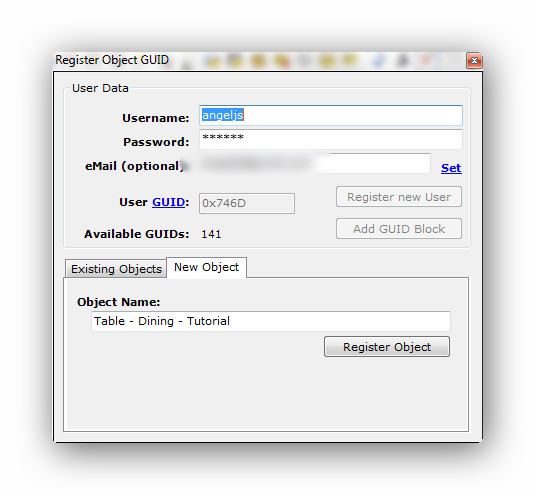
In the box that pops up, you’ll either have to register as a new user, or input your username and password. Then simply click ‘Register Object’:
When the box closes, tick the ‘update all MMAT’s box’, then click ‘Update’ then Commit’:
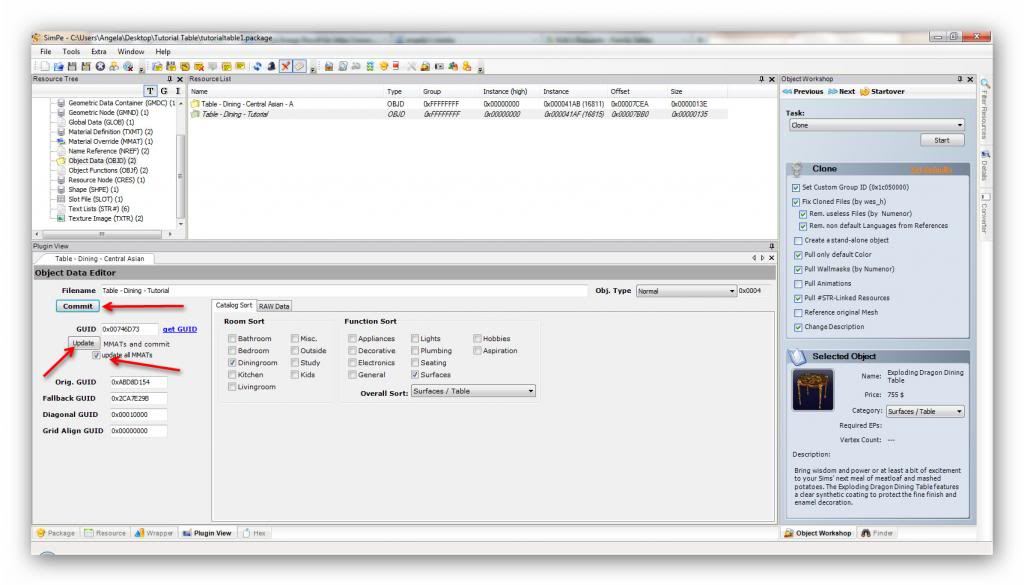
VERY IMPORTANT: YOU ONLY TICK THE UPDATE ALL MMAT’S BOX FOR THE MAIN FILE, NEVER FOR ANY OF THE OTHERS, IF THERE ARE ANY!
For the second file, do the same, leaving the ‘A’ at the end of the name, but this time, DO NOT tick ‘update all MMAT’s:
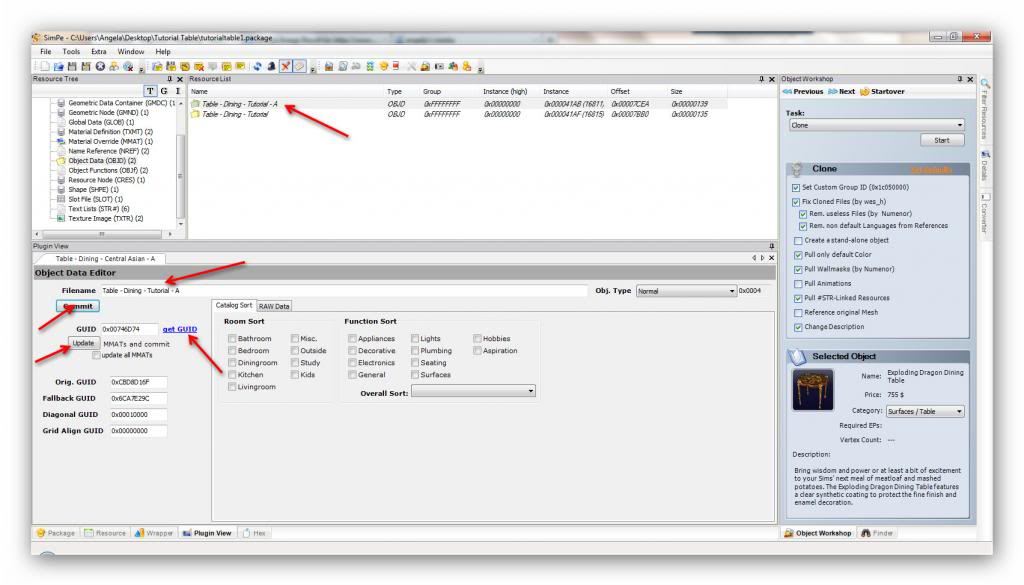
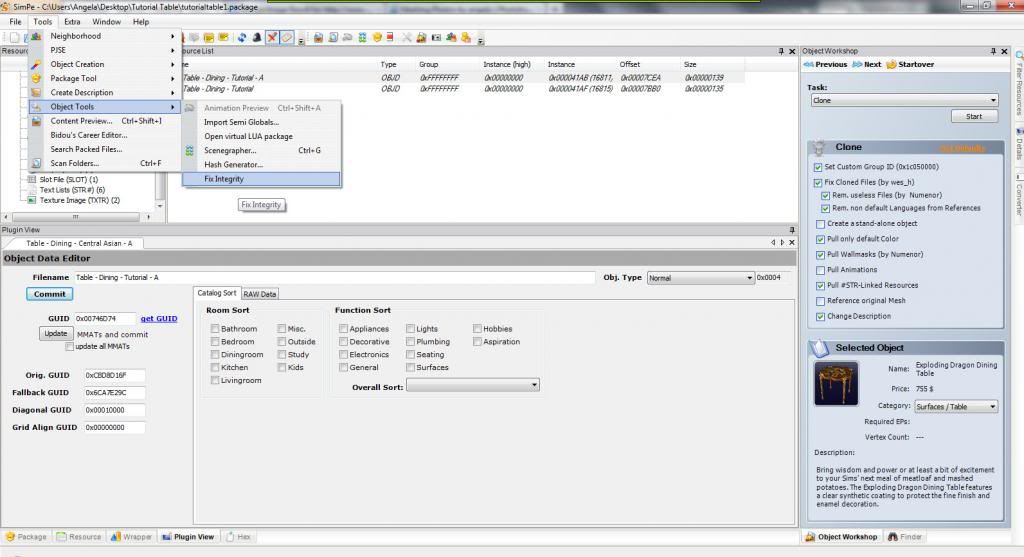
From the top menu, click ‘Tools/Object Tools/Fix Integrity’, then ‘OK’ when the box pops up:
Now save your file. I would also ‘save as’ to your Sims 2 downloads folder so you can try it out in your game.
Congratulations, you have just created your new mesh! Now shall we see what it looks like in game?
Testing the mesh
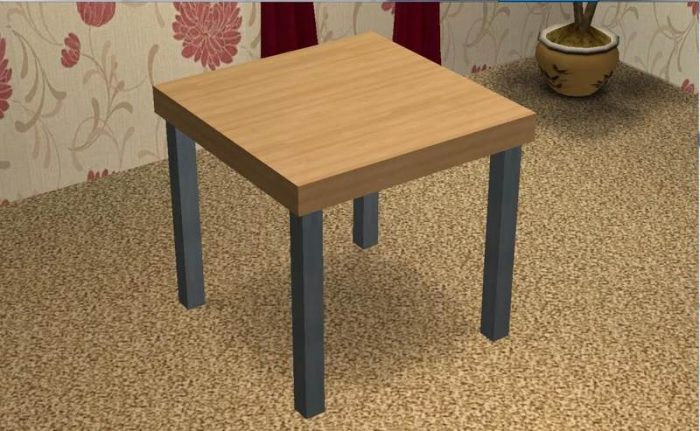
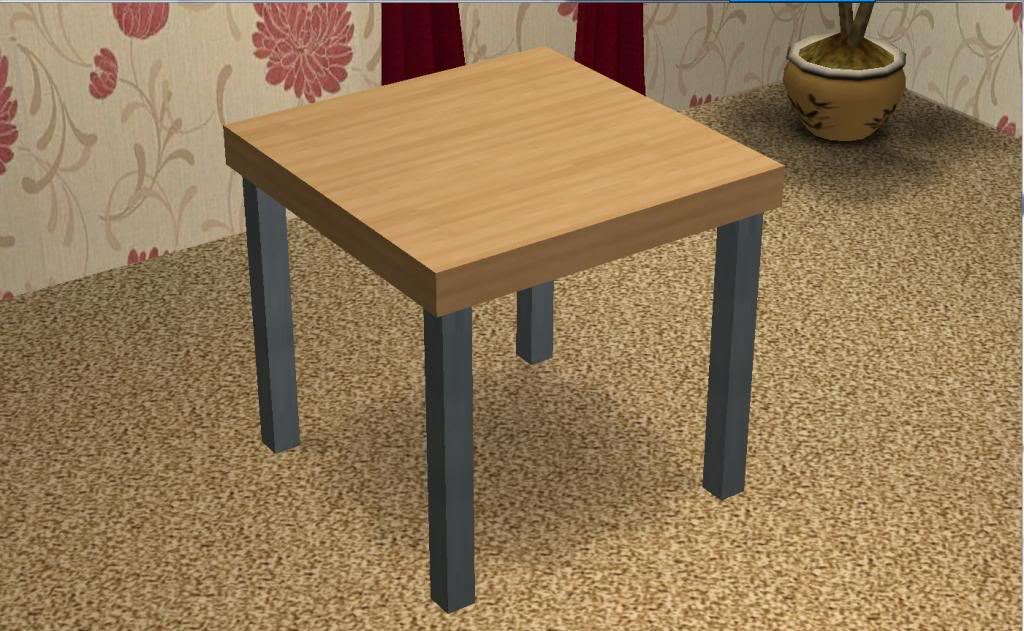
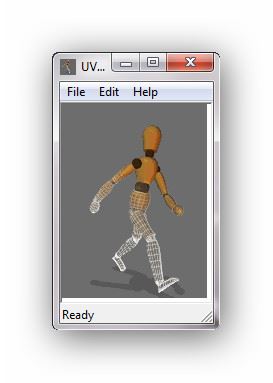
Now fire up your game to see if it shows up and looks okay. Don’t worry too much if it doesn’t look as good as you expected – the fact that you have just created an object for your game is an amazing accomplishment! Just keep trying until you get it right.As I said, my mapping leaves a lot to be desired as the texture isn’t as defined as it should be, but with determination, perseverance and practice, you can create some stunning items! Here’s what my humble tutorial table looks like:
Notice, though, that the shadow image is not quite right. I haven’t mastered shadow creation yet, but I’m trying. 🙂 You can right-click and delete the shadow image from within SimPE’s texture list if you don’t want it to look odd:
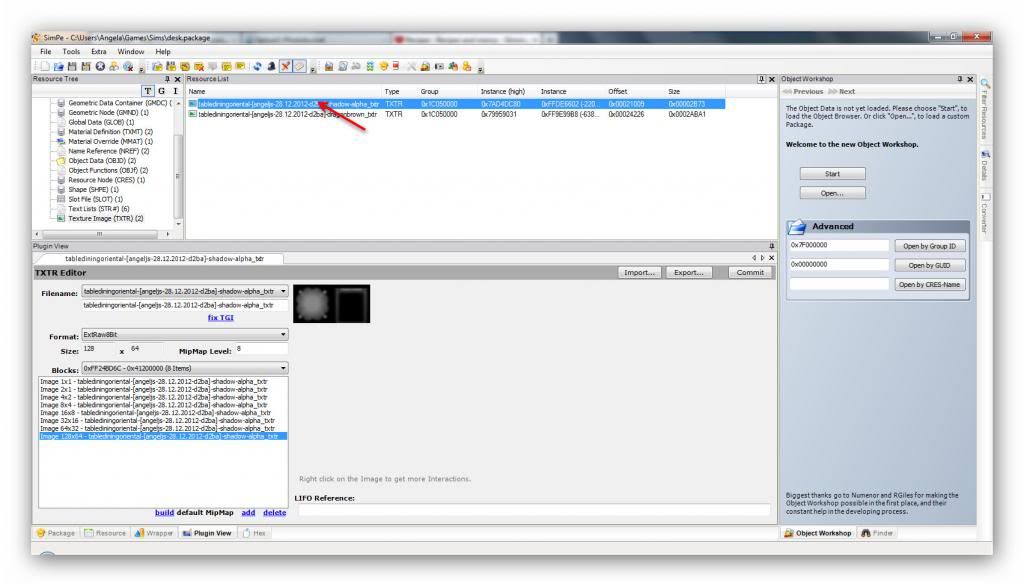
Then delete the shadow files from the GMDC ‘Groups’ section:

If you managed to get through all of this tutorial without going mad, then you are definitely made to mesh! 😀 Give yourself a well-deserved pat on the back, have a rest, and try again later, and soon you will be turning out your original masterpieces for the Sims world to enjoy!

You must be a logged in member to download this file
Lady Angel! This is wonderful! I’m going to try again. My son is coming for Christmas, maybe he’ll help me except that my grandchildren ages 4 and 2 don’t have a bedtime and don’t take naps!! All the best and thank you so very much for writing this. I will be so thrilled if I can make a table!
Oh, I’m so pleased you’re not giving up! This will be easier to make than the candlestick, but the process is the same, it can’t really be made any simpler than this…I hope! lol. Anyway, just let me know if you get stuck or don’t understand anything…good luck!
I’m about to start adding texture which is super hard for me because I don’t really understand gimp yet. For my candlestick I selected the stick and bucket filled with a silver pattern from the program itself and I thought I bucket filled the candle with white but it all bled together. My candle looks like a baby bottle on a pedestal! Now we’ll see about the table. Can I fill just the actual table top or do I have to select and fill the whole thing?
You can select and fill any part of the table you want, all with different textures/colours if you like. So you could select the whole thing and make it all 1 texture, or you could colour the top and legs differently.
Here is my “sofa back table” and as you can see it’s really rough! I can’t get the gist of gimp so I used irfanview which is what I’m used to, but the texture is bad so, when son comes tomorrow, will ask for help! But thank you soooo very much for this tutorial!
You’re really picking up meshing, the table looks great! The mapping is always the hardest part, for me at any rate. In UVMapper, try selecting all and mapping the whole thing as a box. Then save the image as 1024×1024. I find sometimes that saving the image with these dimensions helps the texture not to look so stretched. (Any image editor will do the job, so just use what you’re used to.)
I’d love to see this table in our downloads section, so please have another go with the mapping! 🙂
Thanks so much for your reply! If I remap the table and retexture it, how do I apply the changes in simpe? Do I have to replace wood again and get another guid or just open a new texture image?
Just re-import the mesh (replace the wood) and the texture and save and it should be fine. You don’t need to do anything else unless you are using it to create a brand, new object.
I somehow lost my discourse table from the sim game, I imagine by replacing that file instead of the new mesh one when I redid the texture. Oh well. I don’t suppose there is anyway to get it back? I can live without it. May I have your honest opinion of this, my 6th attempt to retexture! I just can’t seem to sharpen up the texture. It’s always blurry. This is the best I’ve done so far.
That’s looking so much better. It’s really hard to get to grips with mapping, it’s all a matter of keeping the proportions right when resizing the maps. It just takes practice, but you are definitely getting there.
The disappearing table is a bit trickier. I’ve found BlackPearlSims invaluable for troubleshooting meshes and things, you may want to try there for advice.